2.4. Running the SRW App
This section explains how to set up and run the basic “out-of-the-box” case for the SRW Application. However, the steps are relevant to any SRW App experiment and can be modified to suit user goals. This chapter assumes that users have already built the SRW App by following the steps in Section 2.3 (or Section 2.2.3 if running the containerized version of the SRW App).
The out-of-the-box SRW App case builds a weather forecast for June 15-16, 2019. Multiple convective weather events during these two days produced over 200 filtered storm reports. Severe weather was clustered in two areas: the Upper Midwest through the Ohio Valley and the Southern Great Plains. This forecast uses a predefined 25-km Continental United States (CONUS) domain (RRFS_CONUS_25km), the Global Forecast System (GFS) version 16 physics suite (FV3_GFS_v16 CCPP), and FV3-based GFS raw external model data for initialization.
Attention
The SRW Application has four levels of support. The steps described in this section will work most smoothly on preconfigured (Level 1) systems. They should also work on other systems (including generic Linux/Mac systems), but the user may need to perform additional troubleshooting.
The overall procedure for generating an experiment is shown in Figure 2.2, with the scripts to generate and run the workflow shown in red. Once the SRW App has been built, as described in Chapter 2.3, the steps to run a forecast are as follows:
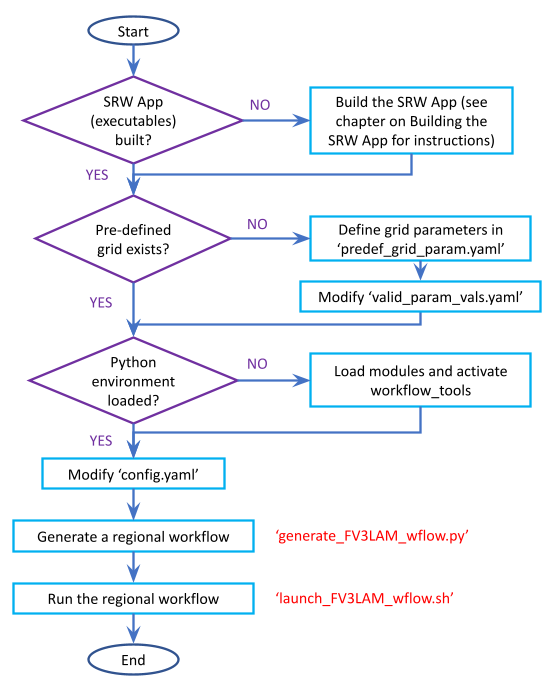
Fig. 2.2 Overall Layout of the SRW App Workflow
2.4.1. Download and Stage the Data
The SRW App requires input files to run. These include static datasets, initial and boundary conditions files, and model configuration files. On Level 1 systems, the data required to run SRW App tests are already available in the following locations:
Machine |
File location |
|---|---|
Derecho |
/glade/work/epicufsrt/contrib/UFS_SRW_data/develop/input_model_data |
Gaea-C6 |
/gpfs/f6/bil-fire8/world-shared/UFS_SRW_data/develop/input_model_data/ |
Hera |
/scratch3/NCEPDEV/nems/role.epic/hera/UFS_SRW_data/develop/input_model_data |
Hercules |
/work/noaa/epic/role-epic/contrib/UFS_SRW_data/develop/input_model_data// |
NOAA Cloud |
/contrib/EPIC/UFS_SRW_data/develop/input_model_data/ |
Orion |
/work/noaa/epic/role-epic/contrib/UFS_SRW_data/develop/input_model_data/ |
Ursa |
/scratch3/NCEPDEV/nems/role.epic/ursa/UFS_SRW_data/develop/input_model_data |
For Level 2-4 systems, the data must be added to the user’s system. Detailed instructions on how to add the data can be found in Section 3.2.3: Downloading and Staging Input Data. Sections 3.2.1: Input Files and 3.2.2: Output Files contain useful background information on the input and output files used in the SRW App.
2.4.2. Grid Configuration
The SRW App officially supports the five predefined grids shown in Table 2.8. The out-of-the-box SRW App case uses the RRFS_CONUS_25km predefined grid option. More information on the predefined and user-generated grid options can be found in Section 3.3: Limited Area Model (LAM) Grids. Users who plan to utilize one of the five predefined domain (grid) options may continue to the next step (Step 2.4.3: Generate the Forecast Experiment). Users who plan to create a new custom predefined grid should refer to the instructions in Section 3.3.2: Creating User-Generated Grids. At a minimum, these users will need to add the new grid name to the experiment.jsonschema file and add the corresponding grid-specific parameters in the predef_grid_params.yaml file.
Grid Name |
Grid Type |
Quilting (write component) |
|---|---|---|
RRFS_CONUS_25km |
ESG grid |
lambert_conformal |
RRFS_CONUS_13km |
ESG grid |
lambert_conformal |
RRFS_CONUS_3km |
ESG grid |
lambert_conformal |
SUBCONUS_Ind_3km |
ESG grid |
lambert_conformal |
RRFS_NA_13km |
ESG grid |
lambert_conformal |
2.4.3. Generate the Forecast Experiment
Generating the forecast experiment requires three steps:
The first two steps depend on the platform being used and are described here for each Level 1 platform. Users will need to adjust the instructions to reflect their machine’s configuration if they are working on a Level 2-4 platform. Information in Section 3.1: Configuring the Workflow can help with this.
2.4.3.1. Load the Conda/Python Environment
The SRW App workflow requires a variety of Python packages. To manage the packages, the App relies on conda as a package manager and virtual environment manager. At build time, users have the option to install the latest version of miniforge and automatically create the environments needed by the SRW App. Managed environments will no longer be updated on Level 1 platforms for newer versions of the SRW App.
2.4.3.1.1. Loading the Workflow Environment
The srw_app conda/Python environment can be activated in the following way:
source /path/to/ufs-srweather-app/etc/lmod-setup.sh <platform>
module use /path/to/ufs-srweather-app/modulefiles
module load wflow_<platform>
where <platform> is a valid, lowercased machine name (see MACHINE in Section 3.1.1 for valid values), and /path/to/ is replaced by the actual path to the ufs-srweather-app.
In a csh shell environment, users should replace lmod-setup.sh with lmod-setup.csh.
Note
If users source the lmod-setup file on a system that doesn’t need it, it will not cause any problems (it will simply do a module purge).
The wflow_<platform> modulefile will then output instructions to activate the SRW App workflow. The user should run the commands specified in the modulefile output. The command may vary from system to system. For example, if the output says:
Please do the following to activate conda:
    > conda activate srw_app
then the user should run conda activate srw_app. This activates the srw_app conda environment, and the user typically sees (srw_app) in front of the Terminal prompt at this point.
Note
If users do not use the wflow_<platform> module to load conda, conda will need to be initialized before running conda activate srw_app command. Depending on the user’s system and login setup, this may be accomplished in a variety of ways. Conda initialization usually involves the following command: source <conda_basedir>/etc/profile.d/conda.sh, where <conda_basedir> is the base conda installation directory and by default will be the full path to ufs-srweather-app/conda.
After loading the workflow environment, users may continue to Section 2.4.3.2 for instructions on setting the experiment configuration parameters.
2.4.3.1.1.1. Modify a wflow_<platform> File
Users can copy one of the provided wflow_<platform> files from the modulefiles directory and use it as a template to create a wflow_<platform> file that functions on their system. The wflow_macos and wflow_linux template modulefiles are provided as a starting point, but any wflow_<platform> file could be used. Since conda environments are installed with the SRW App build, the existing modulefiles will be able to automatically find those environments. No need to edit any of the information in those files for Python purposes.
2.4.3.2. Set Experiment Configuration Parameters
Each experiment requires certain basic information to run (e.g., date, grid, physics suite). Default values are assigned in config_defaults.yaml, and users adjust the desired variables in the experiment configuration file named config.yaml. When generating a new experiment, the SRW App first reads and assigns default values from config_defaults.yaml. Then, it reads and (re)assigns variables from the user’s custom config.yaml file.
2.4.3.2.1. Default configuration: config_defaults.yaml
In general, config_defaults.yaml is split into sections by category (e.g., user:, platform:, workflow:, task_make_grid:). Each of the sections may have subsections describing run-time resource requirements in an execution: block with a structure described by the uwtools YAML documentation here and variables that are used as bash environment variables in the run scripts will appear under the envvars: block. Users can view a full list of categories and configuration parameters in the Table of Variables in config_defaults.yaml. Definitions and default values of each of the variables can be found in Section 3.1: Workflow Parameters and in the config_defaults.yaml file comments. Some of these default values are intentionally invalid in order to ensure that the user assigns valid values in their config.yaml file. There is usually no need for a user to modify config_defaults.yaml because any settings provided in config.yaml will override the settings in config_defaults.yaml.
2.4.3.2.2. User-specific configuration: config.yaml
The user must set the specifics of their experiment configuration in a config.yaml file located in the ufs-srweather-app/ush directory. Two example templates are provided in that directory: config.community.yaml and config.nco.yaml. The first file is a basic example for creating and running an experiment in community mode (with RUN_ENVIR set to community). The second is an example for creating and running an experiment in the NCO (operational) mode (with RUN_ENVIR set to nco). The community mode is recommended in most cases, and user support is available for running in community mode. The operational/NCO mode is typically used by developers at the Environmental Modeling Center (EMC) and the Global Systems Laboratory (GSL) who are working on pre-implementation testing for the Rapid Refresh Forecast System (RRFS). Table 2.9 compares the configuration variables that appear in the config.community.yaml with their default values in config_defaults.yaml.
Parameter |
Default Value |
config.community.yaml Value |
|---|---|---|
RUN_ENVIR |
“nco” |
“community” |
MACHINE |
“BIG_COMPUTER” |
“hera” |
ACCOUNT |
“” |
“an_account” |
USE_CRON_TO_RELAUNCH |
false |
false |
EXPT_SUBDIR |
“” |
“test_community” |
CCPP_PHYS_SUITE |
“FV3_GFS_v16” |
“FV3_GFS_v16” |
PREDEF_GRID_NAME |
“” |
“RRFS_CONUS_25km” |
DATE_FIRST_CYCL |
“YYYYMMDDHH” |
‘2019061518’ |
DATE_LAST_CYCL |
“YYYYMMDDHH” |
‘2019061518’ |
FCST_LEN_HRS |
24 |
12 |
PREEXISTING_DIR_METHOD |
“delete” |
“rename” |
VERBOSE |
true |
true |
COMPILER |
“intel” |
“intel” |
EXTRN_MDL_NAME_ICS |
“FV3GFS” |
“FV3GFS” |
FV3GFS_FILE_FMT_ICS |
“nemsio” |
“grib2” |
EXTRN_MDL_NAME_LBCS |
“FV3GFS” |
“FV3GFS” |
LBC_SPEC_INTVL_HRS |
6 |
6 |
FV3GFS_FILE_FMT_LBCS |
“nemsio” |
“grib2” |
QUILTING |
true |
true |
COMOUT_REF |
“” |
“” |
DO_ENSEMBLE |
false |
false |
NUM_ENS_MEMBERS |
1 |
2 |
2.4.3.2.2.1. General Instructions for All Systems
To get started with a basic forecast in community mode, make a copy of config.community.yaml. From the ufs-srweather-app directory, run:
cd ush
cp config.community.yaml config.yaml
The default settings in this file include a predefined 25-km CONUS grid (RRFS_CONUS_25km), the GFS v16 physics suite (FV3_GFS_v16 CCPP), and FV3-based GFS raw external model data for initialization.
Next, users should edit the new config.yaml file to customize it for their machine. On most systems, the following fields need to be updated or added to the appropriate section of the config.yaml file in order to run the out-of-the-box SRW App case:
user:
   MACHINE: hera
   ACCOUNT: an_account
workflow:
   EXPT_SUBDIR: test_community
task_get_extrn_ics:
   USE_USER_STAGED_EXTRN_FILES: true
   EXTRN_MDL_SOURCE_BASEDIR_ICS: "/path/to/UFS_SRW_data/develop/input_model_data/<model_type>/<data_type>/${yyyymmddhh}"
task_get_extrn_lbcs:
   USE_USER_STAGED_EXTRN_FILES: true
   EXTRN_MDL_SOURCE_BASEDIR_LBCS: "/path/to/UFS_SRW_data/develop/input_model_data/<model_type>/<data_type>/${yyyymmddhh}"
- where:
MACHINErefers to a valid machine name (see Section 3.1.1 for options).ACCOUNTrefers to a valid account name. Not all systems require a valid account name, but most Level 1 & 2 systems do.
Hint
To determine an appropriate ACCOUNT field for Level 1 systems, run
groups, and it will return a list of projects you have permissions for. Not all of the listed projects/groups have an HPC allocation, but those that do are potentially valid account names.Users can also try running
saccount_params, which provides more information but is not available on all systems.
EXPT_SUBDIRis changed to an experiment name of the user’s choice./path/to/is the path to the SRW App data on the user’s machine (see Section 2.4.1 for data locations on Level 1 systems).<model_type>refers to a subdirectory containing the experiment data from a particular model. Valid values on Level 1 systems correspond to the valid values forEXTRN_MDL_NAME_ICSandEXTRN_MDL_NAME_LBCS(see Section 3.1.8.1 or 3.1.9.1 for options).<data_type>refers to one of 3 possible data formats:grib2,nemsio, ornetcdf.${yyyymmddhh}refers to a subdirectory containing data for the cycle date (in YYYYMMDDHH format). Users may hardcode this value or leave it as-is, and the experiment will derive the correct value fromDATE_FIRST_CYCLand related information.
On platforms where Rocoto and cron are available, users can automate resubmission of their experiment workflow by adding the following lines to the workflow: section of the config.yaml file:
USE_CRON_TO_RELAUNCH: true
CRON_RELAUNCH_INTVL_MNTS: 3
Attention
Cron is not available on Derecho or Gaea. On Orion/Hercules, users must be logged into the [hercules/orion]-login-1 node to use cron.
When running with GNU compilers (i.e., if the modulefile used to set up the build environment in Section 2.3.4 uses a GNU compiler), users must also set COMPILER: "gnu" in the workflow: section of the config.yaml file.
For example, to run the out-of-the-box experiment on Hercules using cron to automate job submission, users can ssh to the hercules-login-1 node and add or modify variables in the user, workflow, task_get_extrn_ics, and task_get_extrn_lbcs sections of config.yaml according to the following example (unmodified variables are not shown here):
user:
   MACHINE: hercules
   ACCOUNT: epic
workflow:
   EXPT_SUBDIR: run_basic_srw
   USE_CRON_TO_RELAUNCH: true
   CRON_RELAUNCH_INTVL_MNTS: 3
task_get_extrn_ics:
   USE_USER_STAGED_EXTRN_FILES: true
   EXTRN_MDL_SOURCE_BASEDIR_ICS: /work/noaa/epic/role-epic/contrib/UFS_SRW_data/develop/input_model_data/FV3GFS/grib2/2019061518
task_get_extrn_lbcs:
   USE_USER_STAGED_EXTRN_FILES: true
   EXTRN_MDL_SOURCE_BASEDIR_LBCS: /work/noaa/epic/role-epic/contrib/UFS_SRW_data/develop/input_model_data/FV3GFS/grib2/2019061518
Hint
Valid values for configuration variables should be consistent with those in the
ush/experiment.jsonschemascript.Various sample configuration files can be found within the subdirectories of
tests/WE2E/test_configs.Users can find detailed information on configuration parameter options in Section 3.1: Configuring the Workflow.
2.4.3.2.2.2. Turning On/Off Workflow Tasks
The ufs-srweather-app/parm/wflow directory contains several YAML files that configure different workflow task groups. Each task group file contains a number of tasks that are typically run together. Table 2.10 describes each of the task groups.
File |
Function |
|---|---|
aqm_post.yaml |
SRW-AQM post-processing tasks |
aqm_prep.yaml |
SRW-AQM pre-processing tasks |
coldstart.yaml |
Tasks required to run a cold-start forecast |
default_workflow.yaml |
Sets the default workflow (prep.yaml, coldstart.yaml, post.yaml) |
plot.yaml |
Plotting tasks |
post.yaml |
Post-processing tasks |
prdgen.yaml |
Horizontal map projection processor that creates smaller domain products from the larger domain created by the UPP. |
prep.yaml |
Pre-processing tasks |
verify_det.yaml |
Deterministic verification tasks |
verify_ens.yaml |
Ensemble verification tasks |
verify_pre.yaml |
Verification pre-processing tasks |
The default workflow task groups are set in parm/wflow/default_workflow.yaml and include prep.yaml, coldstart.yaml, and post.yaml. To turn on/off tasks in the workflow, users must alter the list of task groups in the rocoto: tasks: taskgroups: section of config.yaml. The list in config.yaml will override the default and run only the task groups listed. For example, to omit cycle-independent tasks and run plotting tasks, users would delete prep.yaml from the list of tasks and add plot.yaml:
rocoto:
  tasks:
    taskgroups: '{{ ["parm/wflow/coldstart.yaml", "parm/wflow/post.yaml", "parm/wflow/plot.yaml"]|include }}'
Users may need to make additional adjustments to config.yaml depending on which task groups they add or remove. For example, when plotting, the user should add the plotting increment (PLOT_FCST_INC) for the plotting tasks in task_plot_allvars (see Section 2.4.3.2.3 on plotting).
Users can omit specific tasks from a task group by including them under the list of tasks as an empty entry. For example, if a user wanted to run only task_pre_post_stat from aqm_post.yaml, the taskgroups list would include aqm_post.yaml, and the tasks that the user wanted to omit would be listed with no value:
rocoto:
  tasks:
    taskgroups: '{{ ["parm/wflow/prep.yaml", "parm/wflow/coldstart.yaml", "parm/wflow/post.yaml", "parm/wflow/aqm_post.yaml"]|include }}'
    task_post_stat_o3:
    task_post_stat_pm25:
    task_bias_correction_o3:
    task_bias_correction_pm25:
Next Steps:
To add the graphics plotting tasks to the experiment workflow, go to the next section Plotting Configuration.
To configure an experiment to run METplus verification tasks, see Section 2.4.3.2.4.
Otherwise, skip to Section 2.4.3.3 to generate the workflow.
2.4.3.2.3. Plotting Configuration (optional)
An optional Python plotting task (plot_allvars) can be activated in the workflow to generate plots for the FV3-LAM post-processed GRIB2 output over the CONUS. It generates graphics plots for a number of variables, including:
This workflow task can produce both plots from a single experiment and difference plots that compare the same cycle from two experiments. When plotting the difference, the two experiments must be on the same domain and available for the same cycle starting date/time and forecast hours. Other parameters may differ (e.g., the experiments may use different physics suites).
2.4.3.2.3.1. Cartopy Shapefiles
The Python plotting tasks require a path to the directory where the Cartopy Natural Earth shapefiles are located. The medium scale (1:50m) cultural and physical shapefiles are used to create coastlines and other geopolitical borders on the map. On Level 1 systems, this path is already set in the system’s machine file using the variable FIXshp. Users on other systems will need to download the shapefiles and update the path of $FIXshp in the machine file they are using (e.g., $SRW/ush/machine/macos.yaml for a generic MacOS system, where $SRW is the path to the ufs-srweather-app directory). The subset of shapefiles required for the plotting task can be obtained from the SRW Data Bucket. The full set of medium-scale (1:50m) Cartopy shapefiles can be downloaded here.
2.4.3.2.3.2. Task Configuration
Users will need to add or modify certain variables in config.yaml to run the plotting task(s). At a minimum, to activate the plot_allvars tasks, users must add the task’s .yaml file to the default list of taskgroups under the rocoto: tasks: section.
rocoto:
  tasks:
    taskgroups: '{{ ["parm/wflow/prep.yaml", "parm/wflow/coldstart.yaml", "parm/wflow/post.yaml", "parm/wflow/plot.yaml"]|include }}'
Users may also wish to adjust the start, end, and increment value for the plotting task in the config.yaml file. For example:
task_plot_allvars:
   PLOT_FCST_START: 0
   PLOT_FCST_INC: 6
   PLOT_FCST_END: 12
If the user chooses not to set these values, the default values will be used (see Section 3.1.15 for defaults).
Note
If a forecast starts at 18 UTC, this is considered the 0th forecast hour, so “starting forecast hour” should be 0, not 18.
When plotting output from a single experiment, no further adjustments are necessary. The output files (in .png format) will be located in the experiment directory under the $CDATE/postprd subdirectory where $CDATE
corresponds to the cycle date and hour in YYYYMMDDHH format (e.g., 2019061518).
2.4.3.2.3.2.1. Plotting the Difference Between Two Experiments
When plotting the difference between two experiments (expt1 and expt2), users must set the COMOUT_REF template variable in expt2’s config.yaml file to point at forecast output from the expt1 directory. For example, in community mode, users can set COMOUT_REF as follows in the expt2 configuration file:
task_plot_allvars:
   COMOUT_REF: '${EXPT_BASEDIR}/expt1/${PDY}${cyc}/postprd'
This will ensure that expt2 can produce a difference plot comparing expt1 and expt2. In community mode, using default directory names and settings, $COMOUT_REF will resemble /path/to/expt_dirs/test_community/2019061518/postprd. Additional details on the plotting variables are provided in Section 3.1.15.
The output files (in .png format) will be located in the postprd directory for the experiment.
Next Steps:
To configure an experiment to run METplus verification tasks, see the next section.
Otherwise, skip to Section 2.4.3.3 to generate the workflow.
2.4.3.2.4. Configure METplus Verification Suite (Optional)
Users who want to use the METplus verification (VX) suite to evaluate their forecasts or to evaluate
a staged forecast (e.g. from another forecasting system) need to add additional information to their
machine file (ush/machine/<platform>.yaml) or their config.yaml file. Other users may skip
to the next step (Section 2.4.3.3: Generate the SRW App Workflow).
To use METplus verification, MET and METplus modules need to be installed on the system. In order to ensure all capabilities work as expected, users should use at a minimum the latest release of these tools as of the latest SRW release: MET 12.0.1 and METplus 6.0.0.
Note
If users update their METplus installation, they must also update the module load statements in ufs-srweather-app/modulefiles/tasks/<machine>/run_vx.local to correspond to their system’s updated installation:
module use -a /path/to/met/modulefiles
module load met/<version.X.X>
module load metplus/<version.X.X>
2.4.3.2.4.1. Background
Whether generated by the SRW App or another forecasting system, a forecasting experiment consists of one or more forecast periods known as cycles. If there is one forecast per cycle, the experiment is referred to briefly as a deterministic forecast, and if there are multiple, it is referred to as an ensemble forecast. Verification of a deterministic forecast is known (unsurprisingly) as deterministic VX, while verification of an ensemble forecast as a whole is known as ensemble VX. It is also possible to consider each member of an ensemble separately and verify each such member deterministically.
The SRW App allows users to include in the Rocoto XML that defines the workflow various tasks that
perform deterministic and/or ensemble VX. The forecast files to be verified may be generated as part
of the SRW experiment that is performing the verification, or they may be pre-generated files that
are staged somewhere on disk. In the latter case, the forecast files may have been generated from a
previous SRW experiment, or they may have been generated from another forecasting system altogether
(see Section 2.4.3.2.4.5 for the procedure to stage forecast files). In the SRW
App, the flag DO_ENSEMBLE in the global: section of config.yaml specifies whether the
(generated or staged) forecast files to be verified constitute a deterministic or an ensemble forecast.
Setting DO_ENSEMBLE: False (the default) causes the SRW App workflow to assume that the forecast
is deterministic, while setting DO_ENSEMBLE: True causes it to assume that the forecast is ensemble.
In the latter case, the number of ensemble members must be specified via the variable NUM_ENS_MEMBERS,
also found in the global: section of config.yaml.
Both deterministic and ensemble VX require observation and forecast files as well as possible preprocessing of those files. Thus, whenever deterministic or ensemble VX tasks are included in the workflow, preprocessing (meta)tasks must also be included that check for the presence of the required obs and forecast files on disk, retrieve obs files if necessary from a data store such as NOAA HPSS (see note below regarding forecast files), and preprocess both types of files as needed. We refer to these collectively as the VX preprocessing tasks.
Note
Currently, the SRW App workflow does not support the ability to retrieve forecast files from data stores; these must either be generated by the forecast model in the SRW App or be manually staged by the user. See Section 2.4.3.2.4.5 for details.
2.4.3.2.4.2. Adding VX Tasks to the Workflow
To add verification tasks to the workflow, users must include the VX taskgroup files verify_pre.yaml,
verify_det.yaml, and/or verify_ens.yaml (all located in the parm/wflow directory) in the rocoto:
tasks: taskgroups: section of config.yaml. Table 2.11 specifies the set of workflow
VX (meta)tasks that each verify_*.yaml file defines. As implied above, users must add verify_pre.yaml
to rocoto: tasks: taskgroups: anytime they want to run deterministic and/or ensemble VX because this
contains VX preprocessing tasks that are required by both VX types. Then users can add verify_det.yaml
to run deterministic VX on either a deterministic forecast or on each member of an ensemble forecast, they
can add verify_ens.yaml to run ensemble VX on an ensemble forecast, or they can add both if they want to
run both deterministic and ensemble VX on an ensemble forecast (where the deterministic VX is performed on
each member of the ensemble).
Taskgroup File |
Taskgroup Description |
|---|---|
|
Defines (meta)tasks that run the VX preprocessing tasks that are prerequisites for both deterministic and ensemble VX. |
|
Defines (meta)tasks that perform deterministic VX on a single forecast or on each member of an ensemble
forecast (the latter requires |
|
Defines (meta)tasks that perform ensemble VX on an ensemble of forecasts as a whole (requires |
For example, to enable deterministic VX, rocoto: tasks: taskgroups: may be set as follows:
rocoto:
tasks:
taskgroups: '{{ ["parm/wflow/prep.yaml", "parm/wflow/coldstart.yaml", "parm/wflow/post.yaml",
"parm/wflow/verify_pre.yaml", "parm/wflow/verify_det.yaml"]|include }}'
This setting can apply to either a deterministic or an ensemble forecast. In the latter case, it will
cause deterministic VX will be performed on each member of the ensemble (but not on the ensemble as a
whole). Note that with this setting, the UFS Weather Model will be run as part of the workflow to generate
forecast output because prep.yaml, coldstart.yaml, and post.yaml are also included in
rocoto: tasks: taskgroups:. Whether these forecasts are deterministic or ensemble depends on
whether DO_ENSEMBLE in config.yaml is set to False or True, respectively (and, if
True, NUM_ENS_MEMBERS must be set to the number of ensemble members). Similarly, to enable
ensemble VX for an ensemble forecast as well as deterministic VX for each member of that ensemble,
rocoto: tasks: taskgroups: may be set as follows:
rocoto:
  tasks:
    taskgroups: '{{ ["parm/wflow/prep.yaml", "parm/wflow/coldstart.yaml", "parm/wflow/post.yaml",
                     "parm/wflow/verify_pre.yaml", "parm/wflow/verify_det.yaml" "parm/wflow/verify_ens.yaml"]|include }}'
If deterministic VX of each ensemble member is not desired, verify_det.yaml must be left out of the
above. Note that, as in the previous example, this setting of rocoto: tasks: taskgroups: will cause
the workflow to run the UFS Weather Model to generate forecast output because prep.yaml, coldstart.yaml,
and post.yaml are again included, but in this case, DO_ENSEMBLE must be set to True (and
NUM_ENS_MEMBERS set appropriately) in config.yaml because inclusion of verify_ens.yaml requires
that the forecast be an ensemble one.
If users want to manually stage the forecast files instead of generating them with the SRW’s native weather
model (see Section 2.4.3.2.4.5 for the procedure), they must exclude prep.yaml,
coldstart.yaml, and post.yaml from the examples above. Also, regardless of whether the forecast
files are generated by the SRW App or staged manually by the user, if the forecast to be verified is an
ensemble one, in the global: section of config.yaml users must set DO_ENSEMBLE to True
and NUM_ENS_MEMBERS to the number of ensemble members. This tells the workflow to look for multiple
forecasts for each cycle instead of just one (as well as the number of such forecasts).
More information about configuring the rocoto: section can be found in Section 3.4.
2.4.3.2.4.3. VX Taskgroup Organization and VX Field Groups
The VX (meta)tasks in the verify_*.yaml taskgroup files are described in detail in Table 2.15. They are organized as follows.
The (meta)tasks in verify_pre.yaml each
operate on a single observation (obs) type (except for metatask_check_post_output_all_mems, which operates on the
forecast(s) and checks for the presence of all necessary forecast files), while the ones in verify_det.yaml
and verify_ens.yaml operate on one or more verification field groups. A verification field group
represents one or more meteorologial fields that are operated on (e.g. verified) together in a single
call to one of the METplus tools (such as GridStat, PointStat, GenEnsProd, and EnsembleStat), and each
field group has associated with it an obs type against which those forecast fields are verified. The
set of valid VX field groups, the obs types they are associated with, and a brief description of the
fields they include are given in Table 2.12.
VX Field Group |
Associated Obs Type |
Fields Included in Group |
|---|---|---|
APCP |
CCPA |
Accumulated precipitation for the accumulation intervals specified in |
ASNOW |
NOHRSC |
Accumulated snowfall for the accumulation intervals specified in |
REFC |
MRMS |
Composite reflectivity |
RETOP |
MRMS |
Echo top |
SFC |
NDAS |
Various surface and near-surface fields (e.g. at the surface, 2 m, 10 m, etc) |
UPA |
NDAS |
Various upper-air fields (e.g. at 800 mb, 500 mb, etc) |
AOD |
AERONET |
Aerosol Optical Depth |
PM25 |
AIRNOW |
Volumetric mass of particulate matter diameter 2.5 microns or less |
PM10 |
AIRNOW |
Volumetric mass of particulate matter diameter 10 microns or less |
The VX_FIELD_GROUPS list in the verification: section of config.yaml specifies the VX field
groups for which to run verification. In order to avoid unwanted computation, the Rocoto XML will include
only those (meta)tasks that operate on field groups or obs types associated with field groups in VX_FIELD_GROUPS.
Thus, inclusion of a verify_*.yaml taskgroup file under the
rocoto: tasks: taskgroups: section of config.yaml does not mean that all the (meta)tasks in that
file will be included in the workflow. For example, setting:
VX_FIELD_GROUPS: [ 'APCP', 'REFC', 'RETOP', 'SFC', 'UPA' ]
in config.yaml and including all three taskgroups verify_*.yaml in rocoto: tasks: taskgroups:
will add to the Rocoto XML the VX (meta)tasks for all valid field groups except those for accumulated
snowfall ('ASNOW') and its associated obs type (NOHRSC). In other words, all the (meta)tasks
in Table 2.15. will be included in the Rocoto XML except for those
associated with the NOHRSC obs type and the 'ASNOW' field group. Users might want to set
VX_FIELD_GROUPS in this way for example because the forecast experiment they are verifying is for a
summer period for which ASNOW is not relevant.
2.4.3.2.4.4. Staging Observation Files
The taskgroup in verify_pre.yaml defines a set of workflow tasks named get_obs_*, where the *
represents any one of the supported obs types: CCPA, NOHRSC, MRMS, NDAS, AERONET, and AIRNOW. These get_obs_* tasks
will first check on disk for the existence of the obs files required for VX using the locations specified
by the variables *_OBS_DIR and OBS_*_FN_TEMPLATES[1,3,...] in the verification: section of
config.yaml. The *_OBS_DIR are the base directories in which the obs files are or should be
staged, and the OBS_*_FN_TEMPLATES[1,3,...] are the file name templates (with METplus time strings
used for templating; see example below). Thus, the templates for the full paths to the obs files are
given by:
{*_OBS_DIR}/{OBS_*_FN_TEMPLATES[1,3,...]}
The contents of the OBS_*_FN_TEMPLATES list come in pairs, where the first element
of each pair (with even-numbered indices [0,2,...]) refers to the field group,
while the second element (with odd-numbered indices [1,3,...]) refers to the
corresponding sets of files that the obs type contains. Note that OBS_*_FN_TEMPLATES
[1,3,...] may include leading subdirectories and are
relative to the obs type’s *_OBS_DIR.
If the obs files exist at the locations specified by {*_OBS_DIR}/{OBS_*_FN_TEMPLATES[1,3,...]}, then the get_obs_* tasks will
succeed, and the workflow will move on to subsequent tasks. If one or more obs files do not exist, the
get_obs_* tasks will attempt to retrieve the required files from a data store such as NOAA HPSS and
place them in the locations specified by {*_OBS_DIR}/{OBS_*_FN_TEMPLATES[1,3,...]}. Assuming
that attempt is successful, the workflow will move on to subsequent tasks. Thus:
Users who have the obs files already available (staged) on their system only need to set
*_OBS_DIRandOBS_*_FN_TEMPLATES[1,3,...]inconfig.yamlto match those staging locations and file names.Users who do not have the obs files available on their systems and do not have access to NOAA HPSS need to download CCPA, NOHRSC, MRMS, NDAS, AERONET, and/or AIRNOW files manually from collections of publicly available data. Then, as above, they must set
*_OBS_DIRandOBS_*_FN_TEMPLATES[1,3,...]to match those staging locations and file names.
Note
AIRNOW observations can be retrieved from AWS or HPSS, but retrieving from AWS requires changing some default settings.
See ush/config_defaults.yaml or Section 3.1.18.1 for more details.
Users who have access to a data store that hosts the necessary files (e.g. NOAA HPSS) do not need to manually stage the obs data because the
get_obs_*tasks will retrieve the necessary obs and place them in the locations specified by*_OBS_DIRandOBS_*_FN_TEMPLATES[1,3,...]. By default, the files will be placed under the experiment directory, but users may change the values of these variables if they want the retrieved files to be placed elsewhere.
As an example, consider a case in which all four types of obs are needed for verification. Then *_OBS_DIR
and OBS_*_FN_TEMPLATES might be set as follows:
verification:

   CCPA_OBS_DIR: /path/to/UFS_SRW_data/develop/obs_data/ccpa
   NOHRSC_OBS_DIR: /path/to/UFS_SRW_data/develop/obs_data/nohrsc
   MRMS_OBS_DIR: /path/to/UFS_SRW_data/develop/obs_data/mrms
   NDAS_OBS_DIR: /path/to/UFS_SRW_data/develop/obs_data/ndas
   AERONET_OBS_DIR: /path/to/UFS_SRW_data/develop/obs_data/aeronet
   AIRNOW_OBS_DIR: /path/to/UFS_SRW_data/develop/obs_data/airnow

   OBS_CCPA_FN_TEMPLATES: [ 'APCP', '{valid?fmt=%Y%m%d}/ccpa.t{valid?fmt=%H}z.01h.hrap.conus.gb2' ]
   OBS_NOHRSC_FN_TEMPLATES: [ 'ASNOW', 'sfav2_CONUS_6h_{valid?fmt=%Y%m%d%H}_grid184.grb2' ]
   OBS_MRMS_FN_TEMPLATES: [ 'REFC', '{valid?fmt=%Y%m%d}/MergedReflectivityQCComposite_00.50_{valid?fmt=%Y%m%d}-{valid?fmt=%H%M%S}.grib2',
                            'RETOP', '{valid?fmt=%Y%m%d}/EchoTop_18_00.50_{valid?fmt=%Y%m%d}-{valid?fmt=%H%M%S}.grib2' ]
   OBS_NDAS_FN_TEMPLATES: [ 'SFC_UPA', 'prepbufr.ndas.{valid?fmt=%Y%m%d%H}' ]
   OBS_AERONET_FN_TEMPLATES: [ 'AOD', '{valid?fmt=%Y%m%d}/{valid?fmt=%Y%m%d}.lev15' ]
   OBS_AIRNOW_FN_TEMPLATES: [ 'PM', '{valid?fmt=%Y%m%d}/HourlyAQObs_{valid?fmt=%Y%m%d%H}.dat' ]
Note
For AIRNOW obs retrieved from AWS (see parm/data_locations.yml, the default value should be
replaced with:
OBS_AIRNOW_FN_TEMPLATES: [ 'PM', '{valid?fmt=%Y%m%d}/HourlyData_{valid?fmt=%Y%m%d%H}.dat' ]
Now further consider the CCPA obs type. If one of the days encompassed by the forecast(s) is 20240429,
then the get_obs_ccpa task associated with this day will check for the existence of the set of obs
files given by
/path/to/UFS_SRW_data/develop/obs_data/ccpa/20240429/ccpa.t{HH}z.01h.hrap.conus.gb2
where {HH} takes on all hours of this day at which the verification requires CCPA obs. For example,
if performing (deterministic or ensemble) VX on 1-hour APCP for a 3-hour forecast that starts at 06z,
{HH} will take on the values 07, 08, and 09. Then the files that get_obs_ccpa will look for
are:
/path/to/UFS_SRW_data/develop/obs_data/ccpa/20240429/ccpa.t07z.01h.hrap.conus.gb2
/path/to/UFS_SRW_data/develop/obs_data/ccpa/20240429/ccpa.t08z.01h.hrap.conus.gb2
/path/to/UFS_SRW_data/develop/obs_data/ccpa/20240429/ccpa.t09z.01h.hrap.conus.gb2
If all these exist, get_obs_ccpa will simply confirm their existence and will not need to retrieve
any files. If not, it will try to retrieve the files from a data store such as NOAA HPSS and place them
at the above locations.
2.4.3.2.4.5. Staging Forecast Files
As noted above, the SRW App currently does not support the ability to retrieve forecast files from data stores. Thus, the forecast files must either be generated by the forecast model in the SRW App, or they must be manually staged by the user. Note that manually staged forecast files do not have to be ones generated by the SRW App; they can be outputs from another forecasting system.
The locations of the forecast files are defined by the variables VX_FCST_INPUT_BASEDIR,
FCST_SUBDIR_TEMPLATE, and FCST_FN_TEMPLATE in the verification: section of config.yaml.
VX_FCST_INPUT_BASEDIR is the base directory in which the files are located, FCST_SUBDIR_TEMPLATE
is a template specifying a set of subdirectories under VX_FCST_INPUT_BASEDIR, and FCST_FN_TEMPLATE
is the file name template. As with the obs, the templating in FCST_SUBDIR_TEMPLATE and
FCST_FN_TEMPLATE uses METplus time strings. Thus, the full template to the forecast files
is given by
{VX_FCST_INPUT_BASEDIR}/{FCST_SUBDIR_TEMPLATE}/{FCST_FN_TEMPLATE}
If the forecast files are manually staged, then these three variables must be set such that they together point to the locations of the staged files. If they are generated by the SRW App, then the user does not need to set these variables; they will by default be set to point to the forecast files.
2.4.3.2.4.6. Summary
In summary, users must take the following steps to enable VX tasks in the SRW App workflow:
Add the necessary VX taskgroup files
verify_*.yamlto therocoto: tasks: taskgroups:section ofconfig.yaml.verify_pre.yamlmust always be added;verify_det.yamlmust be added to enable deterministic VX (either of a deterministic forecast or of each member of an ensemble forecast); andverify_ens.yamlmust be added to enable ensemble VX (of an ensemble forecast as a whole).If performing ensemble verification and/or deterministic verification of ensemble members (i.e. if the forecast to be verified is an ensemble), in the
global:section ofconfig.yamlsetDO_ENSEMBLEtoTrueandNUM_ENS_MEMBERSto the number of ensemble members.If manually staging the obs files (e.g. because users don’t have access to NOAA HPSS), set the variables
*_OBS_DIRandOBS_*_FN_TEMPLATES[1,3,...]in theverification:section ofconfig.yamlto the locations of these files on disk (where the*in these variable names can be any of the supported obs types).If manually staging the forecast files (as opposed to generating them by running the weather model in the SRW App), set the forecast file paths to the locations of these files on disk using the variables
VX_FCST_INPUT_BASEDIR,FCST_SUBDIR_TEMPLATE, andFCST_FN_TEMPLATEin theverification:section ofconfig.yaml.Specify the field groups to verify in the list
VX_FIELD_GROUPSin theverification:section ofconfig.yaml. Valid values for field groups are given in Table 2.12.
After completing these steps, users can proceed to generate the experiment (see Section 2.4.3.3)
2.4.3.3. Generate the SRW App Workflow
Run the following command from the ufs-srweather-app/ush directory to generate the workflow:
./generate_FV3LAM_wflow.py
The last line of output from this script, starting with */1 * * * * or */3 * * * *, can be saved and used later to automatically run portions of the workflow if users have the Rocoto workflow manager installed on their system.
This workflow generation script creates an experiment directory and populates it with all the data needed to run through the workflow. The flowchart in Figure 2.3 describes the experiment generation process. The generate_FV3LAM_wflow.py script:
Runs the
setup.pyscript to set the configuration parameters. This script reads several other configuration scripts in order:
config_defaults.yaml(Section 2.4.3.2.1)
${machine}.yaml(the machine configuration file)
config.yaml(Section 2.4.3.2.2)Symlinks the time-independent (fix) files and other necessary data input files from their location to the experiment directory (
$EXPTDIR).Creates the input namelist file
input.nmlbased on theinput.nml.FV3file in theparmdirectory.Creates the workflow XML file
FV3LAM_wflow.xmlthat is executed when running the experiment with the Rocoto workflow manager.
The generated workflow will appear in $EXPTDIR, where EXPTDIR=${EXPT_BASEDIR}/${EXPT_SUBDIR}; these variables were specified in config_defaults.yaml and config.yaml in Step 2.4.3.2. The settings for these directory paths can also be viewed in the console output from the ./generate_FV3LAM_wflow.py script or in the log.generate_FV3LAM_wflow file, which can be found in $EXPTDIR.
Fig. 2.3 Experiment Generation Description
2.4.3.4. Description of Workflow Tasks
Note
This section gives a general overview of workflow tasks. To begin running the workflow, skip to Step 2.4.4
Figure 2.4 illustrates the overall workflow. Individual tasks that make up the workflow are detailed in the FV3LAM_wflow.xml file. Table 2.13 describes the function of each baseline task. The first three pre-processing tasks; make_grid, make_orog, and make_sfc_climo; are optional. If the user stages pre-generated grid, orography, and surface climatology fix files, these three tasks can be skipped by removing the prep.yaml file from the default taskgroups entry in the config.yaml file before running the generate_FV3LAM_wflow.py script:
rocoto:
  tasks:
    taskgroups: '{{ ["parm/wflow/coldstart.yaml", "parm/wflow/post.yaml"]|include }}'
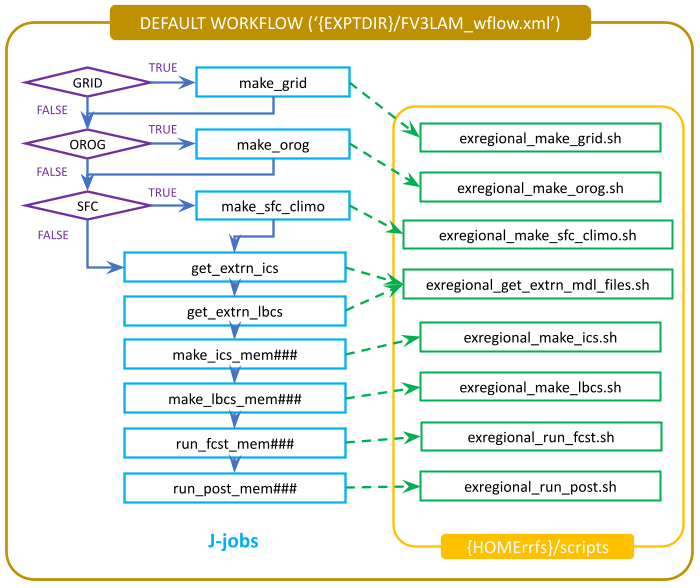
Fig. 2.4 Flowchart of the Default Workflow Tasks
The FV3LAM_wflow.xml file runs the specific j-job scripts (jobs/JREGIONAL_[task name]) in the prescribed order when the experiment is launched via the launch_FV3LAM_wflow.sh script or the rocotorun command. Each j-job task has its own source script (or “ex-script”) named exregional_[task name].sh in the ufs-srweather-app/scripts directory. Two database files named FV3LAM_wflow.db and FV3LAM_wflow_lock.db are generated and updated by the Rocoto calls. There is usually no need for users to modify these files. To relaunch the workflow from scratch, delete these two *.db files and then call the launch script repeatedly for each task.
Workflow Task |
Task Description |
|---|---|
make_grid |
Pre-processing task to generate regional grid files. Only needs to be run once per experiment. |
make_orog |
Pre-processing task to generate orography files. Only needs to be run once per experiment. |
make_sfc_climo |
Pre-processing task to generate surface climatology files. Only needs to be run once per experiment. |
get_extrn_ics |
Cycle-specific task to obtain external data for the initial conditions (ICs) |
get_extrn_lbcs |
Cycle-specific task to obtain external data for the lateral boundary conditions (LBCs) |
make_ics_* |
Generate ICs from the external data |
make_lbcs_* |
Generate LBCs from the external data |
run_fcst_* |
Run the forecast model (UFS Weather Model) |
run_post_* |
Run the post-processing tool (UPP) |
integration_test_* |
Run integration test |
In addition to the baseline tasks described in Table 2.13 above, users may choose to run a variety of optional tasks, including plotting and verification tasks.
Workflow Task |
Task Description |
|---|---|
plot_allvars |
Run the plotting task and, optionally, the difference plotting task |
The METplus verification tasks and metatasks that are included by default in verify_*.yaml are described in Table 2.15. The taskgroup entry after the name of each (meta)task indicates the taskgroup file that must be included in the user’s config.yaml file under rocoto: tasks: taskgroups: in order for that (meta)task to be considered for inclusion in the workflow (see Section 3.4 for details). Metatasks define a set of tasks in the workflow based on multiple values of one or more parameters such as the ensemble member index, the accumulation interval (for cumulative fields such as accumulated precipitation), and the name of the verification field group (see description of VX_FIELD_GROUPS in Section 3.1.18.1).
Workflow (Meta)Task ( |
Task Description |
|---|---|
task_get_obs_ccpa ( |
Checks for existence of staged CCPA obs files at locations specified by |
task_get_obs_nohrsc ( |
Checks for existence of staged NOHRSC obs files at locations specified by |
task_get_obs_mrms ( |
Checks for existence of staged MRMS obs files at locations specified by |
task_get_obs_ndas ( |
Checks for existence of staged NDAS obs files at locations specified by |
task_get_obs_aeronet ( |
Checks for existence of staged AERONET obs files at locations specified by |
task_get_obs_airnow ( |
Checks for existence of staged AIRNOW obs files at locations specified by |
task_run_MET_Pb2nc_obs_NDAS ( |
Converts NDAS obs prepbufr files to NetCDF format. |
metatask_ASCII2nc_obs ( |
Set of tasks that convert observations in ASCII text format to NetCDF files that can be processed by
METplus; these observation types include AERONET and AIRNOW. This metatask is included in the
workflow only if |
metatask_PcpCombine_APCP_all_accums_obs_CCPA ( |
Set of tasks that generate NetCDF files containing observed APCP for the accumulation intervals
specified in |
metatask_PcpCombine_ASNOW_all_accums_obs_NOHRSC ( |
Set of tasks that generate NetCDF files containing observed ASNOW for the accumulation intervals
specified in |
metatask_PcpCombine_fcst_PM_all_mems ( |
Set of tasks that convert the raw forecast output of particulate matter into the appropriate bins for
PM 2.5 and PM10. This metatask is included in the workflow only if |
metatask_check_post_output_all_mems ( |
Set of tasks that ensure that the post-processed forecast files required for verification exist in
the locations specified by |
metatask_PcpCombine_APCP_all_accums_all_mems ( |
Set of tasks that generate NetCDF files containing forecast APCP for the accumulation intervals
specified in |
metatask_PcpCombine_ASNOW_all_accums_all_mems ( |
Set of tasks that generate NetCDF files containing forecast ASNOW for the accumulation intervals
specified in |
metatask_GridStat_APCP_all_accums_all_mems ( |
Set of tasks that run grid-to-grid verification of accumulated precipitation (represented by the
verification field group |
metatask_GridStat_ASNOW_all_accums_all_mems ( |
Set of tasks that run grid-to-grid verification of accumulated snowfall (represented by the verification
field group |
metatask_GridStat_REFC_RETOP_all_mems ( |
Set of tasks that run grid-to-grid verification of composite reflectivity (represented by
the verification field group |
metatask_PointStat_SFC_UPA_all_mems ( |
Set of tasks that run grid-to-point verification of surface fields (represented by the verification field
group |
metatask_GenEnsProd_EnsembleStat_APCP_all_accums ( |
Set of tasks that run MET’s |
metatask_GenEnsProd_EnsembleStat_ASNOW_all_accums ( |
Set of tasks that run MET’s |
metatask_GenEnsProd_EnsembleStat_REFC_RETOP ( |
Set of tasks that run MET’s |
metatask_GenEnsProd_EnsembleStat_SFC_UPA ( |
Set of tasks that run MET’s |
metatask_GridStat_APCP_all_accums_ensmeanprob ( |
Set of tasks that run grid-to-grid verification of the ensemble mean of APCP and grid-to-grid probabilistic
verification of the ensemble of APCP forecasts as a whole. In Rocoto, the tasks under this metatask for
ensemble mean verification are named |
metatask_GridStat_ASNOW_all_accums_ensmeanprob ( |
Set of tasks that run grid-to-grid verification of the ensemble mean of ASNOW and grid-to-grid probabilistic
verification of the ensemble of ASNOW forecasts as a whole. In Rocoto, the tasks under this metatask for
ensemble mean verification are named |
metatask_GridStat_REFC_RETOP_ensprob ( |
Set of tasks that run grid-to-grid probabilistic verification of the ensemble of composite reflectivity
(represented by the verification field group |
metatask_PointStat_SFC_UPA_ensmeanprob ( |
Set of tasks that run grid-to-grid verification of the ensemble mean of surface fields (represented by the
verification field group |
2.4.4. Run the Workflow
The workflow can be run using the Rocoto workflow manager (see Section 2.4.4.1) or using standalone wrapper scripts (see Section 2.4.4.2).
Attention
If users are running the SRW App on a system that does not have Rocoto installed (e.g., Level 3 & 4 systems, such as many MacOS or generic Linux systems), they should follow the process outlined in Section 2.4.4.2.
2.4.4.1. Run the Workflow Using Rocoto
The information in this section assumes that Rocoto is available on the desired platform. All official HPC platforms for the UFS SRW App make use of the Rocoto workflow management software for running experiments. However, if Rocoto is not available, it is still possible to run the workflow using stand-alone scripts according to the process outlined in Section 2.4.4.2.
There are three ways to run the workflow with Rocoto: (1) automation via crontab (2) by calling the launch_FV3LAM_wflow.sh script, and (3) by manually issuing the rocotorun command.
Note
Users may find it helpful to review Section 4.1: Rocoto Introductory Information to gain a better understanding of Rocoto commands and workflow management before continuing, but this is not required to run the experiment.
Optionally, an environment variable can be set to navigate to the experiment directory ($EXPTDIR) more easily. If the login shell is bash, it can be set as follows:
export EXPTDIR=/path/to/experiment/directory
If the login shell is csh/tcsh, it can instead be set using:
setenv EXPTDIR /path/to/experiment/directory
2.4.4.1.1. Automated Option
The simplest way to run the Rocoto workflow is to automate the process using a job scheduler such as Cron. For automatic resubmission of the workflow at regular intervals (e.g., every 3 minutes), the user can add the following commands to their config.yaml file before generating the experiment (as outlined in Section 2.4.3.2.2.1):
USE_CRON_TO_RELAUNCH: true
CRON_RELAUNCH_INTVL_MNTS: 3
This will automatically add an appropriate entry to the user’s cron table and launch the workflow. Alternatively, the user can add a crontab entry manually using the crontab -e command. As mentioned in Section 2.4.3.3, the last line of output from ./generate_FV3LAM_wflow.py (usually starting with */3 * * * *), can be pasted into the crontab file. It can also be found in the $EXPTDIR/log.generate_FV3LAM_wflow file. The crontab entry should resemble the following:
*/3 * * * * cd /path/to/experiment/directory && ./launch_FV3LAM_wflow.sh called_from_cron="TRUE"
where /path/to/experiment/directory is changed to correspond to the user’s $EXPTDIR. The number 3 can be changed to a different positive integer; it simply means that the workflow will be resubmitted every three minutes.
Hint
On NOAA Cloud instances,
*/1 * * * *(orCRON_RELAUNCH_INTVL_MNTS: 1) is the preferred option for cron jobs because compute nodes will shut down if they remain idle too long. If the compute node shuts down, it can take 15-20 minutes to start up a new one.On other NOAA HPC systems, administrators discourage using
*/1 * * * *due to load problems.*/3 * * * *(orCRON_RELAUNCH_INTVL_MNTS: 3) is the preferred option for cron jobs on other Level 1 systems.
Attention
Cron is not available on Derecho or Gaea. On Orion/Hercules, users must be logged into the [hercules/orion]-login-1 node to use cron.
To check the experiment progress:
cd $EXPTDIR
rocotostat -w FV3LAM_wflow.xml -d FV3LAM_wflow.db -v 10
Users can track the experiment’s progress by reissuing the rocotostat command above every so often until the experiment runs to completion. The following message usually means that the experiment is still getting set up:
08/04/23 17:34:32 UTC :: FV3LAM_wflow.xml :: ERROR: Can not open FV3LAM_wflow.db read-only because it does not exist
After a few (3-5) minutes, rocotostat should show a status-monitoring table.
The workflow run is complete when all tasks have “SUCCEEDED”. If everything goes smoothly, users will eventually see a workflow status table similar to the following:
CYCLE              TASK                   JOBID         STATE        EXIT STATUS   TRIES   DURATION
==========================================================================================================
201906151800   make_grid                4953154       SUCCEEDED         0          1          5.0
201906151800   make_orog                4953176       SUCCEEDED         0          1         26.0
201906151800   make_sfc_climo           4953179       SUCCEEDED         0          1         33.0
201906151800   get_extrn_ics            4953155       SUCCEEDED         0          1          2.0
201906151800   get_extrn_lbcs           4953156       SUCCEEDED         0          1          2.0
201906151800   make_ics_mem000          4953184       SUCCEEDED         0          1         16.0
201906151800   make_lbcs_mem000         4953185       SUCCEEDED         0          1         71.0
201906151800   run_fcst_mem000          4953196       SUCCEEDED         0          1       1035.0
201906151800   run_post_mem000_f000     4953244       SUCCEEDED         0          1          5.0
201906151800   run_post_mem000_f001     4953245       SUCCEEDED         0          1          4.0
...
201906151800   run_post_mem000_f012     4953381       SUCCEEDED         0          1          7.0
201906151800   integration_test_mem000     4953237       SUCCEEDED         0          1          7.0
If users choose to run METplus verification tasks as part of their experiment, the output above will include additional lines after run_post_mem000_f012. The output will resemble the following but may be significantly longer when using ensemble verification:
CYCLE          TASK                                 JOBID          STATE       EXIT STATUS   TRIES   DURATION
================================================================================================================
201906151800   make_grid                            30466134       SUCCEEDED        0          1          5.0
...
201906151800   run_post_mem000_f012                 30468271       SUCCEEDED        0          1          7.0
201906151800   get_obs_ccpa                         46903539       SUCCEEDED        0          1          9.0
201906151800   get_obs_mrms                         46903540       SUCCEEDED        0          1         12.0
201906151800   get_obs_ndas                         46903541       SUCCEEDED        0          1          9.0
...
201906151800   run_gridstatvx                       30468420       SUCCEEDED        0          1         53.0
201906151800   run_gridstatvx_refc                  30468421       SUCCEEDED        0          1        934.0
201906151800   run_gridstatvx_retop                 30468422       SUCCEEDED        0          1       1002.0
201906151800   run_gridstatvx_03h                   30468491       SUCCEEDED        0          1         43.0
201906151800   run_gridstatvx_06h                   30468492       SUCCEEDED        0          1         29.0
201906151800   run_gridstatvx_24h                   30468493       SUCCEEDED        0          1         20.0
201906151800   run_pointstatvx                      30468423       SUCCEEDED        0          1        670.0
...
201906151800   run_MET_GridStat_vx_APCP01h_mem000      -                   -                   -         -             -
201906151800   run_MET_GridStat_vx_APCP03h_mem000      -                   -                   -         -             -
201906151800   run_MET_GridStat_vx_APCP06h_mem000      -                   -                   -         -             -
201906151800   run_MET_GridStat_vx_REFC_mem000         -                   -                   -         -             -
201906151800   run_MET_GridStat_vx_RETOP_mem000        -                   -                   -         -             -
201906151800   run_MET_PointStat_vx_SFC_mem000         -                   -                   -         -             -
201906151800   run_MET_PointStat_vx_UPA_mem000         -                   -                   -         -             -
After finishing the experiment, open the crontab using crontab -e and delete the crontab entry.
2.4.4.1.2. Launch the Rocoto Workflow Using a Script
Users who prefer not to automate their experiments can run the Rocoto workflow using the launch_FV3LAM_wflow.sh script provided. Simply call it without any arguments from the experiment directory:
cd $EXPTDIR
./launch_FV3LAM_wflow.sh
This script creates a log file named log.launch_FV3LAM_wflow in $EXPTDIR or appends information to the file if it already exists. The launch script also creates the log/FV3LAM_wflow.log file, which shows Rocoto task information. Check the end of the log file periodically to see how the experiment is progressing:
tail -n 40 log.launch_FV3LAM_wflow
In order to launch additional tasks in the workflow, call the launch script again; this action will need to be repeated until all tasks in the workflow have been launched. To (re)launch the workflow and check its progress on a single line, run:
./launch_FV3LAM_wflow.sh; tail -n 40 log.launch_FV3LAM_wflow
This will output the last 40 lines of the log file, which lists the status of the workflow tasks (e.g., SUCCEEDED, DEAD, RUNNING, SUBMITTING, QUEUED). The number 40 can be changed according to the user’s preferences. The output will look similar to this:
CYCLE                          TASK                       JOBID        STATE   EXIT STATUS   TRIES  DURATION
======================================================================================================
201906151800              make_grid         druby://hfe01:33728   SUBMITTING             -       0       0.0
201906151800              make_orog                           -            -             -       -         -
201906151800         make_sfc_climo                           -            -             -       -         -
201906151800          get_extrn_ics         druby://hfe01:33728   SUBMITTING             -       0       0.0
201906151800         get_extrn_lbcs         druby://hfe01:33728   SUBMITTING             -       0       0.0
201906151800        make_ics_mem000                           -            -             -       -         -
201906151800       make_lbcs_mem000                           -            -             -       -         -
201906151800        run_fcst_mem000                           -            -             -       -         -
201906151800   run_post_mem000_f000                           -            -             -       -         -
201906151800   run_post_mem000_f001                           -            -             -       -         -
201906151800   run_post_mem000_f002                           -            -             -       -         -
201906151800   run_post_mem000_f003                           -            -             -       -         -
201906151800   run_post_mem000_f004                           -            -             -       -         -
201906151800   run_post_mem000_f005                           -            -             -       -         -
201906151800   run_post_mem000_f006                           -            -             -       -         -
201906151800   integration_test_mem000

Summary of workflow status:
~~~~~~~~~~~~~~~~~~~~~~~~~~

  0 out of 1 cycles completed.
  Workflow status:  IN PROGRESS
If all the tasks complete successfully, the “Workflow status” at the bottom of the log file will change from “IN PROGRESS” to “SUCCESS”. If certain tasks could not complete, the “Workflow status” will instead change to “FAILURE”. Error messages for each task can be found in the task log files located in $EXPTDIR/log. Users can look at the log file for a failed task to determine what caused the failure. For example, if the make_grid task failed, users can open the make_grid.log file to see what caused the problem:
cd $EXPTDIR/log
vi make_grid.log
After making any required changes, users can restart a DEAD or failed task as described in Section 4.2.3.1 of the FAQ.
The workflow run is complete when all tasks have “SUCCEEDED”, and the rocotostat command outputs a table similar to the one above.
2.4.4.1.3. Launch the Rocoto Workflow Manually
Load Rocoto
Instead of running the ./launch_FV3LAM_wflow.sh script, users can load Rocoto and any other required modules manually. This gives the user more control over the process and allows them to view experiment progress more easily. On Level 1 systems, the Rocoto modules are loaded automatically in Step 2.4.3.1. For most other systems, users can load a modified wflow_<platform> modulefile, or they can use a variant on the following commands to load the Rocoto module:
module use <path_to_rocoto_package>
module load rocoto
Some systems may require a version number (e.g., module load rocoto/1.3.3)
Run the Rocoto Workflow
After loading Rocoto, cd to the experiment directory and call rocotorun to launch the workflow tasks. This will start any tasks that are not awaiting completion of a dependency. As the workflow progresses through its stages, rocotostat will show the state of each task and allow users to monitor progress:
cd $EXPTDIR
rocotorun -w FV3LAM_wflow.xml -d FV3LAM_wflow.db -v 10
rocotostat -w FV3LAM_wflow.xml -d FV3LAM_wflow.db -v 10
The rocotorun and rocotostat commands above will need to be resubmitted regularly and repeatedly until the experiment is finished. In part, this is to avoid having the system time out. This also ensures that when one task ends, tasks dependent on it will run as soon as possible, and rocotostat will capture the new progress.
If the experiment fails, the rocotostat command will indicate which task failed. Users can look at the log file in the log subdirectory for the failed task to determine what caused the failure. For example, if the make_grid task failed, users can open the make_grid.log file to see what caused the problem:
cd $EXPTDIR/log
vi make_grid.log
Note
If users have the Slurm workload manager on their system, they can run the squeue command in lieu of rocotostat to check what jobs are currently running.
2.4.4.2. Run the Workflow Using Stand-Alone Scripts
The SRW App workflow can be run using standalone shell scripts in cases where the Rocoto software is not available on a given platform. If Rocoto is available, see Section 2.4.4.1 to run the workflow using Rocoto.
Attention
When working on an HPC system, users should allocate compute nodes prior to running their experiment. The proper command will depend on the system’s resource manager, but some guidance is offered in Section 2.2.7.2. It may be necessary to reload the build_<platform>_<compiler> scripts (see Section 2.3.4.2) and the workflow environment (see Section 2.4.3.1) after allocating compute nodes.
Note
Examples in this subsection presume that the user is running in the Terminal with a bash shell environment. If this is not the case, users will need to adjust the commands to fit their command line application and shell environment.
cdinto the experiment directory. For example, fromush, presuming default directory settings:cd ../../expt_dirs/test_communitySet the environment variable
$EXPTDIR:export EXPTDIR=`pwd`Copy the wrapper scripts from the
ushdirectory into the experiment directory. Each workflow task has a wrapper script that sets environment variables and runs the job script.cp /path/to/ufs-srweather-app/ush/wrappers/* .Set the
OMP_NUM_THREADSvariable.export OMP_NUM_THREADS=1Run each of the listed scripts in order. Scripts with the same stage number (listed in Table 2.16) may be run simultaneously.
./run_make_grid.sh
./run_get_ics.sh
./run_get_lbcs.sh
./run_make_orog.sh
./run_make_sfc_climo.sh
./run_make_ics.sh
./run_make_lbcs.sh
./run_fcst.sh
./run_post.sh
./run_integration_test.sh
Each task should finish with error code 0. For example:
End exregional_get_extrn_mdl_files.sh at Wed Nov 16 18:08:19 UTC 2022 with error code 0 (time elapsed: 00:00:01)
Check the batch script output file in your experiment directory for a “SUCCESS” message near the end of the file.
Stage/ |
Task Run Script |
Number of Processors |
Wall Clock Time (H:mm) |
|---|---|---|---|
1 |
run_get_ics.sh |
1 |
0:20 (depends on HPSS vs FTP vs staged-on-disk) |
1 |
run_get_lbcs.sh |
1 |
0:20 (depends on HPSS vs FTP vs staged-on-disk) |
1 |
run_make_grid.sh |
24 |
0:20 |
2 |
run_make_orog.sh |
24 |
0:20 |
3 |
run_make_sfc_climo.sh |
48 |
0:20 |
4 |
run_make_ics.sh |
48 |
0:30 |
4 |
run_make_lbcs.sh |
48 |
0:30 |
5 |
run_fcst.sh |
48 |
0:30 |
6 |
run_post.sh |
48 |
0:25 (2 min per output forecast hour) |
7 |
run_integration_test.sh |
1 |
0:05 |
Users can access log files for specific tasks in the $EXPTDIR/log directory. To see how the experiment is progressing, users can also check the end of the log.launch_FV3LAM_wflow file from the command line:
tail -n 40 log.launch_FV3LAM_wflow
Hint
If any of the scripts return an error that “Primary job terminated normally, but one process returned a non-zero exit code,” there may not be enough space on one node to run the process. On an HPC system, the user will need to allocate a(nother) compute node. The process for doing so is system-dependent, and users should check the documentation available for their HPC system. Instructions for allocating a compute node on NOAA HPC systems can be viewed in Section 2.2.7.2 as an example.
Note
On most HPC systems, users will need to submit a batch job to run multi-processor jobs. On some HPC systems, users may be able to run the first two jobs (serial) on a login node/command-line. Example scripts for Slurm (Hera) and PBS (Cheyenne) resource managers are provided (sq_job.sh and qsub_job.sh, respectively). These examples will need to be adapted to each user’s system. Alternatively, some batch systems allow users to specify most of the settings on the command line (with the sbatch or qsub command, for example).