2.3. Building the SRW App
The Unified Forecast System (UFS) Short-Range Weather (SRW) Application is an umbrella repository consisting of a number of different components housed in external repositories. Once the SRW App is built (i.e., components are assembled/compiled), users can configure experiments and generate predictions of atmospheric behavior over a limited spatial area and on time scales ranging from minutes out to several days.
Attention
The SRW Application has four levels of support. The steps described in this chapter will work most smoothly on preconfigured (Level 1) systems.
Note
The container approach is recommended for a smoother first-time build and run experience. Building without a container may allow for more customization. However, the non-container approach requires more in-depth system-based knowledge, especially on Level 3 and 4 systems, so it is less appropriate for beginners.
To build the SRW App, users will complete the following steps:
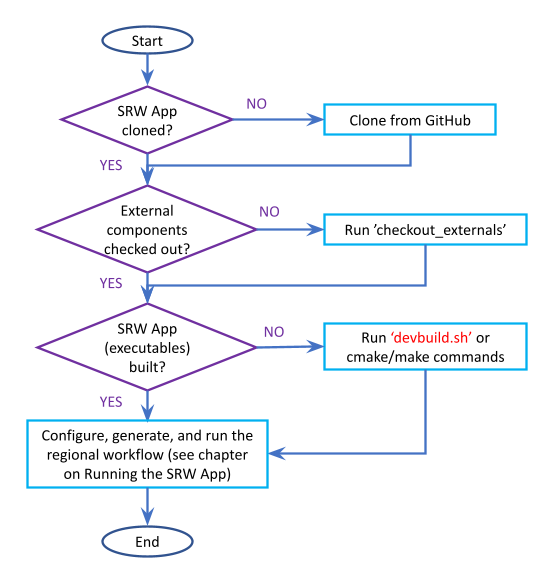
Fig. 2.1 Overview of the SRW App Build Process
2.3.1. Install the Prerequisite Software Stack
Users on any sufficiently up-to-date machine with a UNIX-based operating system should be able to install the prerequisite software stack and run the SRW Application. However, a list of prerequisites is available in Section 1.2.1.2 for reference. Users should install or update their system as required before attempting to install the software stack.
Currently, installation of the prerequisite software stack is supported via spack-stack on most systems. spack-stack is a repository that provides a spack-based system to build the software stack required for UFS applications such as the SRW App. Spack-stack is the software stack validated by the UFS Weather Model (WM), and the SRW App has likewise shifted to spack-stack for most Level 1 systems.
Hint
Skip the spack-stack installation if working on a Level 1 system (e.g., Hera, Hercules, Orion, Ursa, Derecho, NOAA Cloud), and continue to the next section.
2.3.1.1. Background
SRW App components, including the UFS WM, draw on over 50 code libraries to run. These libraries range from libraries developed in-house at NOAA (e.g., NCEPLIBS, FMS) to libraries developed by NOAA’s partners (e.g., PIO, ESMF) to truly third-party libraries (e.g., netCDF). Individual installation of these libraries is not practical, so spack-stack was developed as a central installation system to ensure that the infrastructure environment across multiple platforms is as similar as possible. Installation of spack-stack is required to run the SRW App.
2.3.1.2. Instructions
Users working on systems that fall under Support Levels 2-4 will need to install spack-stack the first time they try to build applications (such as the SRW App) that depend on it. Users can build the stack on their local system or use the centrally maintained stacks on each HPC platform if they are working on a Level 1 system.
For a detailed description of installation options, see the New Site Configs Wiki
2.3.2. Download the UFS SRW Application Code
The SRW Application source code is publicly available on GitHub. To download the SRW App code, clone the develop branch of the repository:
git clone -b develop https://github.com/ufs-community/ufs-srweather-app.git
The cloned repository contains the configuration files and sub-directories shown in
Table 2.5. The user may set an $SRW environment variable to point to the location of the new ufs-srweather-app repository. For example, if ufs-srweather-app was cloned into the $HOME directory, the following commands will set an $SRW environment variable in a bash or csh shell, respectively:
# In a bash shell, run:
export SRW=$HOME/ufs-srweather-app
File/Directory Name |
Description |
|---|---|
CMakeLists.txt |
Main CMake file for SRW App |
devbuild.sh |
SRW App build script |
devclean.sh |
Convenience script that can be used to clean up code if something goes wrong when checking out externals or building the application. |
doc |
Contains release notes, documentation, and User’s Guide |
environment.yml |
Contains information on the package versions required for the regional workflow environment. |
etc |
Contains Lmod startup scripts |
Externals.cfg |
Includes tags pointing to the correct version of the external GitHub repositories/branches used in the SRW App. |
jobs |
Contains the j-job script for each workflow task. These scripts set up the environment variables and call an ex-script script located in the |
LICENSE.md |
CC0 license information |
manage_externals |
Utility for checking out external repositories |
modulefiles |
Contains build and workflow modulefiles |
parm |
Contains parameter files. Includes UFS Weather Model configuration files such as |
README.md |
Contains SRW App introductory information |
rename_model.sh |
Used to rename the model before it is transitioned into operations. The SRW App is a generic app that is the base for models such as AQM and RRFS. When these models become operational, variables like |
scripts |
Contains the ex-script for each workflow task. These scripts are where the task logic and executables are contained. |
sorc |
Contains CMakeLists.txt; source code from external repositories is cloned into this directory. |
tests |
Contains SRW App tests, including workflow end-to-end (WE2E) tests and unit tests. |
ufs_srweather_app_meta.h.in |
Meta information for SRW App which can be used by other packages |
ufs_srweather_app.settings.in |
SRW App configuration summary |
ush |
Contains utility scripts. Includes the experiment configuration file and the experiment generation file. |
versions |
Contains |
2.3.3. Check Out External Components
The SRW App relies on a variety of components (e.g., UFS_UTILS, ufs-weather-model, and UPP) detailed in Section 1.3 of this User’s Guide. Each component has its own repository. Users must run the checkout_externals script to collect the individual components of the SRW App from their respective GitHub repositories. The checkout_externals script uses the configuration file Externals.cfg in the top-level directory of the SRW App to clone the correct tags (code versions) of the external repositories listed in Section 1.2.2.1 into the appropriate directories (e.g., ush, sorc).
Run the executable that pulls in SRW App components from external repositories:
cd /path/to/ufs-srweather-app/
./manage_externals/checkout_externals
The script should output dialogue indicating that it is retrieving different code repositories. It may take several minutes to download these repositories.
Hint
Some systems (e.g., Hercules, Gaea) may have difficulty finding prerequisite software, such as python. If users run into this issue but know that the software exists on their system, they can run module load <module_name> followed by module save. For example:
/usr/bin/env: ‘python’: No such file or directory
hercules-login-1[10] username$ module load python
hercules-login-1[11] username$ module save
Saved current collection of modules to: "default", for system: "hercules"
To see more options for the checkout_externals script, users can run ./manage_externals/checkout_externals -h. For example:
-S: Outputs the status of the repositories managed bycheckout_externals. By default, only summary information is provided. Use with the-v(verbose) option to see details.
-x [EXCLUDE [EXCLUDE ...]]: allows users to exclude components when checking out externals.
-o: This flag will check out the optional external repositories in addition to the default repositories (by default, only the required external repositories are checked out).
Generally, users will not need to use these options and can simply run the script, but the options are available for those who are curious.
2.3.4. Set Up the Environment and Build the Executables
2.3.4.1. devbuild.sh Approach
On Level 1 systems for which a modulefile is provided under the modulefiles directory, users can build the SRW App binaries with the following command:
./devbuild.sh --platform=<machine_name>
where <machine_name> is replaced with the name of the platform the user is working on. See Section 3.1.1 for all valid MACHINE options.
Starting with SRW v2.2.0, the App installs miniconda and SRW environments as part
of the build process. The location defaults to inside the SRW clone in ufs-srweather-app/conda,
however users can set any path on their system using the --conda-dir flag. If conda is already
installed in that location, conda installation will be skipped. The following example uses a
pre-installed conda installation at /path/to/conda
./devbuild.sh --platform=<machine_name> --conda-dir /path/to/conda
Running ./devbuild.sh without any arguments will show the usage statement for all available
flags and targets for this script.
If compiler auto-detection fails for some reason, specify it using the --compiler argument. For example:
./devbuild.sh --platform=hera --compiler=intel
where valid values are intel or gnu.
The last few lines of the console output should include [100%] Built target ufs-weather-model, indicating that the UFS Weather Model executable has been built successfully.
After running devbuild.sh, the executables listed in Table 2.6 should appear in the ufs-srweather-app/exec directory. If the application built properly, users may configure and run an experiment. Users have a few options:
Proceed to Section 2.1: Quick Start Guide for a quick overview of the workflow steps.
Try the SRW App Tutorials (good for new users!).
For detailed information on running the SRW App, including optional tasks like plotting and verification, users can refer to Section 2.4: Running the SRW App.
If the devbuild.sh build method did not work, or if users are not on a supported machine, they will have to manually set up the environment and build the SRW App binaries with CMake as described in Section 2.3.4.2.
Executable Name |
Description |
|---|---|
chgres_cube |
Reads in raw external model (global or regional) and surface climatology data to create initial and lateral boundary conditions |
cpld_gridgen |
Creates the fix and IC files required for the coupled model. |
emcsfc_ice_blend |
Blends National Ice Center sea ice cover and EMC sea ice concentration data to create a global sea ice analysis used to update the GFS once per day |
emcsfc_snow2mdl |
Blends National Ice Center snow cover and Air Force snow depth data to create a global depth analysis used to update the GFS snow field once per day |
filter_topo |
Filters topography based on resolution |
fregrid |
Remaps data from the input mosaic grid to the output mosaic grid |
fvcom_to_FV3 |
Determines lake surface conditions for the Great Lakes |
global_cycle |
Updates the GFS surface conditions using external snow and sea ice analyses |
global_equiv_resol |
Calculates a global, uniform, cubed-sphere equivalent resolution for the regional Extended Schmidt Gnomonic (ESG) grid |
inland |
Creates an inland land mask by determining inland (i.e., non-coastal) points and assigning a value of 1. Default value is 0. |
lakefrac |
Calculates the ratio of the lake area to the grid cell area at each atmospheric grid point. |
make_hgrid |
Computes geo-referencing parameters (e.g., latitude, longitude, grid cell area) for global uniform grids |
make_solo_mosaic |
Creates mosaic files with halos |
orog |
Generates orography, land mask, and gravity wave drag files from fixed files |
orog_gsl |
Creates orographic statistics fields required for the orographic drag suite developed by NOAA’s Global Systems Laboratory (GSL) |
regional_esg_grid |
Generates an ESG regional grid based on a user-defined namelist |
sfc_climo_gen |
Creates surface climatology fields from fixed files for use in |
shave |
Shaves the excess halo rows down to what is required for the lateral boundary conditions (LBCs) in the orography and grid files |
ufs_model |
UFS Weather Model executable |
upp.x |
Post processor for the model output |
vcoord_gen |
Generates hybrid coordinate interface profiles |
weight_gen |
Creates ESMF SCRIP files for gaussian grids. These NetCDF-formatted files are used to create ESMF interpolation weight files. |
2.3.4.2. CMake Approach
2.3.4.2.1. Set Up the Build Environment
Attention
If users successfully built the executables listed in Table 2.6, they can skip to step Section 2.4: Running the SRW App.
If the devbuild.sh approach failed, users need to set up their environment to run a workflow on their specific platform. First, users should make sure Lmod is the app used for loading modulefiles. This is the case on most Level 1 systems; however, on systems such as Gaea, the default modulefile loader is from Cray and must be switched to Lmod. For example, on Gaea, users with a bash shell environment can run:
source /path/to/ufs-srweather-app/etc/lmod-setup.sh gaeac6
Note
If users source the lmod-setup file on systems that don’t need it, it will not cause any problems (it will simply do a module purge).
From here, Lmod is ready to load the modulefiles needed by the SRW App. These modulefiles are located in the modulefiles directory. To load the necessary modulefile for a specific <platform> using a given <compiler>, run:
module use /path/to/ufs-srweather-app/modulefiles
module load build_<platform>_<compiler>
where /path/to/ufs-srweather-app/modulefiles/ is the full path to the modulefiles directory.
This will work on Level 1 systems, where a modulefile is available in the modulefiles directory. Users on Level 2-4 systems will need to modify an appropriate build_<platform>_<compiler> modulefile. One of the current build_<platform>_<compiler> modulefiles can be copied and used as a template. However, users will need to adjust certain environment variables in their modulefile, such as the path to the software stack, so that the SRW App can find and load the appropriate modules.
Note
These instructions assume that Lmod (an SRW App prerequisite) is installed. To check whether Lmod is installed, run echo $LMOD_PKG, and see if it outputs a path to the Lmod package. Building the SRW App without Lmod is not supported at this time. It should be possible to do so, but it has not been tested. Users are encouraged to install Lmod on their system.
2.3.4.2.2. Build the Executables Using CMake
After setting up the build environment in the preceding section (by loading the build_<platform>_<compiler> modulefile), users need to build the executables required to run the SRW App. In the ufs-srweather-app directory, create a subdirectory to hold the build’s executables:
mkdir build
cd build
From the build directory, run the following commands to build the pre-processing utilities, forecast model, and post-processor:
cmake .. -DCMAKE_INSTALL_PREFIX=.. -DCMAKE_INSTALL_BINDIR=exec ..
make -j 4  >& build.out &
-DCMAKE_INSTALL_PREFIX specifies the location where the exec, include, lib, and share directories will be created. These directories will contain various components of the SRW App. Its recommended value .. denotes one directory up from the build directory. In the next line, the make argument -j 4 indicates that the build will run in parallel with four threads. Although users can specify a larger or smaller number of threads (e.g., -j 8, -j 2), it is highly recommended to use at least four parallel threads to prevent overly long installation times.
The build will take a few minutes to complete. When it starts, a random number is printed to the console, and when it is done, a [1]+ Done message is printed to the console. [1]+ Exit indicates an error. Output from the build will be in the ufs-srweather-app/build/build.out file. When the build completes, users should see the forecast model executable ufs_model and several pre- and post-processing executables in the ufs-srweather-app/exec directory. These executables are described in Table 2.6.
Hint
If you see the build.out file, but there is no ufs-srweather-app/exec directory, wait a few more minutes for the build to complete.
There are a few additional steps needed to successfully run the SRW App that is built with CMake. The build_settings.yaml will need to be copied or symlinked from ufs-srweather-app/build to ufs-srweather-app/exec, and the platform name needs to be added to the “Machine” variable in the build_settings.yaml file.
2.3.4.2.3. Install uwtools
For detailed installation instructions, refer to the UW Tools installation guide. The UW team welcomes questions in its GitHub Discussions forum. See Section 1.3.8 for more information on uwtools in the SRW App.
2.3.5. Run an Experiment
To configure and run an experiment, users have a few options:
Proceed to Section 2.1: Quick Start Guide for a quick overview of the workflow steps.
Try the SRW App Tutorials (good for new users!).
For detailed information on running the SRW App, including optional tasks like plotting and verification, users can refer to Section 2.4: Running the SRW App.