4. Building and Running the SRW App
The Unified Forecast System (UFS) Short-Range Weather (SRW) Application is an umbrella repository consisting of a number of different components housed in external repositories. Once the SRW App is built, users can configure an experiment and generate predictions of atmospheric behavior over a limited spatial area and on time scales ranging from minutes out to several days.
This chapter walks users through how to build and run the “out-of-the-box” case for the SRW App. However, the steps are relevant to any SRW Application experiment and can be modified to suit user goals. The out-of-the-box SRW App case builds a weather forecast for June 15-16, 2019. Multiple convective weather events during these two days produced over 200 filtered storm reports. Severe weather was clustered in two areas: the Upper Midwest through the Ohio Valley and the Southern Great Plains. This forecast uses a predefined 25-km Continental United States (CONUS) domain (RRFS_CONUS_25km), the Global Forecast System (GFS) version 16 physics suite (FV3_GFS_v16 CCPP), and FV3-based GFS raw external model data for initialization.
Attention
The SRW Application has four levels of support. The steps described in this chapter will work most smoothly on preconfigured (Level 1) systems. This chapter can also serve as a starting point for running the SRW App on other systems (including generic Linux/Mac systems), but the user may need to perform additional troubleshooting.
Note
The container approach is recommended for a smoother first-time build and run experience. Building without a container allows for the use of the Rocoto workflow manager and may allow for more customization. However, the non-container approach requires more in-depth system-based knowledge, especially on Level 3 and 4 systems, so it is less appropriate for beginners.
The overall procedure for generating an experiment is shown in Figure 4.1, with the scripts to generate and run the workflow shown in red. The steps are as follows:
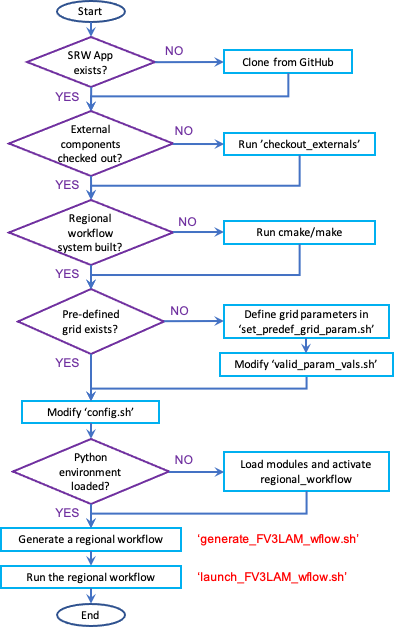
Fig. 4.1 Overall layout of the SRW App Workflow
4.1. Install the HPC-Stack
Attention
Skip the HPC-Stack installation if working on a Level 1 system (e.g., Cheyenne, Hera, Orion, NOAA Cloud).
Definition: HPC-Stack is a repository that provides a unified, shell script-based build system to build the software stack required for UFS applications such as the SRW App.
4.1.1. Background
The UFS Weather Model draws on over 50 code libraries to run its applications. These libraries range from libraries developed in-house at NOAA (e.g., NCEPLIBS, FMS) to libraries developed by NOAA’s partners (e.g., PIO, ESMF) to truly third party libraries (e.g., NETCDF). Individual installation of these libraries is not practical, so the HPC-Stack was developed as a central installation system to ensure that the infrastructure environment across multiple platforms is as similar as possible. Installation of the HPC-Stack is required to run the SRW App.
4.1.2. Instructions
Users working on systems that fall under Support Levels 2-4 will need to install the HPC-Stack the first time they try to build applications (such as the SRW App) that depend on it. Users can either build the HPC-Stack on their local system or use the centrally maintained stacks on each HPC platform if they are working on a Level 1 system. Before installing the HPC-Stack, users on both Linux and MacOS systems should set the stack size to “unlimited” (if allowed) or to the largest possible value:
# Linux, if allowed
ulimit -s unlimited

# MacOS, this corresponds to 65MB
ulimit -S -s unlimited
For a detailed description of installation options, see Installing the HPC-Stack.
After completing installation, continue to the next section (Section 4.2: Download the UFS SRW Application Code).
4.2. Download the UFS SRW Application Code
The SRW Application source code is publicly available on GitHub. To download the SRW App code, clone the release/public-v2 branch of the repository:
git clone -b release/public-v2 https://github.com/ufs-community/ufs-srweather-app.git
The cloned repository contains the configuration files and sub-directories shown in
Table 4.1. The user may set an $SRW environment variable to point to the location of the new ufs-srweather-app repository. For example, if ufs-srweather-app was cloned into the $HOME directory, the following commands will set an $SRW environment variable in a bash or csh shell, respectively:
export SRW=$HOME/ufs-srweather-app
setenv SRW $HOME/ufs-srweather-app
File/Directory Name |
Description |
|---|---|
CMakeLists.txt |
Main CMake file for SRW App |
Externals.cfg |
Includes tags pointing to the correct version of the external GitHub repositories/branches used in the SRW App. |
LICENSE.md |
CC0 license information |
README.md |
Getting Started Guide |
ufs_srweather_app_meta.h.in |
Meta information for SRW App which can be used by other packages |
ufs_srweather_app.settings.in |
SRW App configuration summary |
modulefiles |
Contains build and workflow modulefiles |
etc |
Contains Lmod startup scripts |
docs |
Contains release notes, documentation, and User’s Guide |
manage_externals |
Utility for checking out external repositories |
src |
Contains CMakeLists.txt; external repositories will be cloned into this directory. |
4.3. Check Out External Components
The SRW App relies on a variety of components (e.g., regional_workflow, UFS_UTILS, ufs-weather-model, and UPP) detailed in Chapter 5 of this User’s Guide. Each component has its own repository. Users must run the checkout_externals script to collect the individual components of the SRW App from their respective git repositories. The checkout_externals script uses the configuration file Externals.cfg in the top level directory of the SRW App to clone the correct tags (code versions) of the external repositories listed in Section 1.4.1 into the appropriate directories under the regional_workflow and src directories.
Run the executable that pulls in SRW App components from external repositories:
cd $SRW
./manage_externals/checkout_externals
The script should output dialogue indicating that it is retrieving different code repositories. It may take several minutes to download these repositories.
4.4. Set Up the Environment and Build the Executables
4.4.1. devbuild.sh Approach
On Level 1 systems for which a modulefile is provided under the modulefiles directory, users can build the SRW App binaries with:
./devbuild.sh --platform=<machine_name>
where <machine_name> is replaced with the name of the platform the user is working on. Valid values are: cheyenne | gaea | hera | jet | linux | macos | noaacloud | odin | orion | singularity | wcoss_dell_p3
Note
Although build modulefiles exist for generic Linux and MacOS machines, users will need to alter these according to the instructions in Sections 4.4.2 & 4.4.3. It is recommended that users on these systems build the SRW App with the CMake Approach instead.
If compiler auto-detection fails for some reason, specify it using the --compiler argument. For example:
./devbuild.sh --platform=hera --compiler=intel
where valid values are intel or gnu.
The last line of the console output should be [100%] Built target ufs-weather-model, indicating that the UFS Weather Model executable has been built successfully.
The executables listed in Table 4.2 should appear in the ufs-srweather-app/bin directory. If this build method doesn’t work, or if users are not on a supported machine, they will have to manually setup the environment and build the SRW App binaries with CMake as described in Section 4.4.2.
Executable Name |
Description |
|---|---|
chgres_cube |
Reads in raw external model (global or regional) and surface climatology data to create initial and lateral boundary conditions |
emcsfc_ice_blend |
Blends National Ice Center sea ice cover and EMC sea ice concentration data to create a global sea ice analysis used to update the GFS once per day |
emcsfc_snow2mdl |
Blends National Ice Center snow cover and Air Force snow depth data to create a global depth analysis used to update the GFS snow field once per day |
filter_topo |
Filters topography based on resolution |
fregrid |
Remaps data from the input mosaic grid to the output mosaic grid |
fvcom_to_FV3 |
Determines lake surface conditions for the Great Lakes |
global_cycle |
Updates the GFS surface conditions using external snow and sea ice analyses |
global_equiv_resol |
Calculates a global, uniform, cubed-sphere equivalent resolution for the regional Extended Schmidt Gnomonic (ESG) grid |
inland |
Creates an inland land mask by determining in-land (i.e. non-coastal) points and assigning a value of 1. Default value is 0. |
lakefrac |
Calculates the ratio of the lake area to the grid cell area at each atmospheric grid point. |
make_hgrid |
Computes geo-referencing parameters (e.g., latitude, longitude, grid cell area) for global uniform grids |
make_solo_mosaic |
Creates mosaic files with halos |
orog |
Generates orography, land mask, and gravity wave drag files from fixed files |
orog_gsl |
Ceates orographic statistics fields required for the orographic drag suite developed by NOAA’s Global Systems Laboratory (GSL) |
regional_esg_grid |
Generates an ESG regional grid based on a user-defined namelist |
sfc_climo_gen |
Creates surface climatology fields from fixed files for use in |
shave |
Shaves the excess halo rows down to what is required for the lateral boundary conditions (LBC’s) in the orography and grid files |
upp.x |
Post-processor for the model output |
ufs_model |
UFS Weather Model executable |
vcoord_gen |
Generates hybrid coordinate interface profiles |
4.4.2. CMake Approach
4.4.2.1. Set Up the Build Environment
Attention
If users successfully built the executables in Table 4.2, they should skip to step Step 4.5.
Users who want to build the SRW App on a generic MacOS should skip to Section 4.4.3 and follow the approach there.
If the devbuild.sh approach failed, users need to set up their environment to run a workflow on their specific platform. First, users should make sure Lmod is the app used for loading modulefiles. This is the case on most Level 1 systems; however, on systems such as Gaea/Odin, the default modulefile loader is from Cray and must be switched to Lmod. For example, on Gaea, users can run one of the following two commands depending on whether they have a bash or csh shell, respectively:
source etc/lmod-setup.sh gaea
source etc/lmod-setup.csh gaea
If users execute one of the above commands on systems that don’t need it, it will not cause any problems (it will simply do a module purge).
From here on, Lmod is ready to load the modulefiles needed by the SRW App. These modulefiles are located in the modulefiles directory. To load the necessary modulefile for a specific <platform> using a given <compiler>, run:
module use <path/to/modulefiles>
module load build_<platform>_<compiler>
where <path/to/modulefiles/> is the full path to the modulefiles directory.
This will work on Level 1 systems, where a modulefile is available in the modulefiles directory. On Level 2-4 systems (including generic Linux/MacOS systems), users will need to modify certain environment variables, such as the path to HPC-Stack, so that the SRW App can find and load the appropriate modules. For systems with Lmod installed, one of the current build_<platform>_<compiler> modulefiles can be copied and used as a template. To check whether Lmod is installed, run echo $LMOD_PKG, and see if it outputs a path to the Lmod package. On systems without Lmod, users can modify or set the required environment variables with the export or setenv commands, depending on whether they are using a bash or csh/tcsh shell, respectively:
export <VARIABLE_NAME>=<PATH_TO_MODULE>
setenv <VARIABLE_NAME> <PATH_TO_MODULE>
Note that building the SRW App without Lmod is not supported for this release. It should be possible to do so, but it has not been tested. Users are encouraged to install Lmod on their system.
4.4.2.2. Build the Executables Using CMake
After setting up the build environment in the preceding section (by loading the build_<platform>_<compiler> modulefile), users need to build the executables required to run the SRW App. In the ufs-srweather-app directory, create a subdirectory to hold the build’s executables:
mkdir build
cd build
From the build directory, run the following commands to build the pre-processing utilities, forecast model, and post-processor:
cmake .. -DCMAKE_INSTALL_PREFIX=..
make -j 4  >& build.out &
-DCMAKE_INSTALL_PREFIX specifies the location in which the bin, include, lib, and share directories will be created. These directories will contain various components of the SRW App. Its recommended value .. denotes one directory up from the build directory. In the next line, the make call argument -j 4 indicates that the build will run in parallel with 4 threads. Although users can specify a larger or smaller number of threads (e.g., -j8, -j2), it is highly recommended to use at least 4 parallel threads to prevent overly long installation times.
The build will take several minutes to complete. When it starts, a random number is printed to the console, and when it is done, a [1]+ Done message is printed to the console. [1]+ Exit indicates an error. Output from the build will be in the ufs-srweather-app/build/build.out file. When the build completes, users should see the forecast model executable ufs_model and several pre- and post-processing executables in the ufs-srweather-app/bin directory. These executables are described in Table 4.2. Once all executables have been built, users may continue to Step 4.5.
Hint
If you see the build.out file, but there is no ufs-srweather-app/bin directory, wait a few more minutes for the build to complete.
4.4.3. Additional Details for Building on MacOS
Note
Users who are not building the SRW App on a MacOS machine may skip to the next section.
The SRW App can be built on MacOS machines, presuming HPC-Stack has already been installed successfully. The following two options have been tested:
Option 1: MacBookAir 2020, M1 chip (arm64, running natively), 4+4 cores, Big Sur 11.6.4, GNU compiler suite v.11.2.0_3 (gcc, gfortran, g++); no MPI pre-installed
Option 2: MacBook Pro 2015, 2.8 GHz Quad-Core Intel Core i7 (x86_64), Catalina OS X 10.15.7, GNU compiler suite v.11.2.0_3 (gcc, gfortran, g++); no MPI pre-installed
The build_macos_gnu modulefile initializes the module environment, lists the location of HPC-Stack modules, loads the meta-modules and modules, and sets compilers, additional flags, and environment variables needed for building the SRW App. The modulefile must be modified to include the absolute path to the user’s HPC-Stack installation and ufs-srweather-app directories. In particular, the following section must be modified:
# This path should point to your HPCstack installation directory
setenv HPCstack "/Users/username/hpc-stack/install"

# This path should point to your SRW Application directory
setenv SRW "/Users/username/ufs-srweather-app"
An excerpt of the build_macos_gnu contents appears below for Option 1. To use Option 2, the user will need to comment out the lines specific to Option 1 and uncomment the lines specific to Option 2 in the build_macos_gnu modulefile. Additionally, users need to verify that all file paths reflect their system’s configuration and that the correct version numbers for software libraries appear in the modulefile.
# Option 1 compiler paths:
setenv CC "/opt/homebrew/bin/gcc"
setenv FC "/opt/homebrew/bin/gfortran"
setenv CXX "/opt/homebrew/bin/g++"

# Option 2 compiler paths:
#setenv CC "/usr/local/bin/gcc"
#setenv FC "/usr/local/bin/gfortran"
#setenv CXX "/usr/local/bin/g++"
Then, users must source the Lmod setup file, just as they would on other systems, and load the modulefiles needed for building and running the SRW App:
source etc/lmod-setup.sh macos
module use <path/to/ufs-srweather-app/modulefiles>
module load build_macos_gnu
export LDFLAGS="-L${MPI_ROOT}/lib"
In a csh/tcsh shell, users would run source etc/lmod-setup.csh macos in place of the first line in the code block above.
Additionally, for Option 1 systems, set the variable ENABLE_QUAD_PRECISION to OFF in the $SRW/src/ufs-weather-model/FV3/atmos_cubed_sphere/CMakeLists.txt file. This change is optional if using Option 2 to build the SRW App. To make this change using a streamline editor (sed), run:
sed -i .bak 's/QUAD_PRECISION\" ON)/QUAD_PRECISION\" OFF)/' $SRW/src/ufs-weather-model/FV3/atmos_cubed_sphere/CMakeLists.txt
Proceed to building the executables using the process outlined in Step 4.4.2.2.
4.5. Download and Stage the Data
The SRW App requires input files to run. These include static datasets, initial and boundary conditions files, and model configuration files. On Level 1 systems, the data required to run SRW App tests are already available. For Level 2-4 systems, the data must be added. Detailed instructions on how to add the data can be found in Section 7.3. Sections 7.1 and 7.2 contain useful background information on the input and output files used in the SRW App.
4.6. Grid Configuration
The SRW App officially supports four different predefined grids as shown in Table 4.3. The out-of-the-box SRW App case uses the RRFS_CONUS_25km predefined grid option. More information on the predefined and user-generated grid options can be found in Chapter 8 for those who are curious. Users who plan to utilize one of the four predefined domain (grid) options may continue to Step 4.7. Users who plan to create a new domain should refer to Section 8.2 for details on how to do so. At a minimum, these users will need to add the new grid name to the valid_param_vals.sh script and add the corresponding grid-specific parameters in the set_predef_grid_params.sh script.
Grid Name |
Grid Type |
Quilting (write component) |
|---|---|---|
RRFS_CONUS_25km |
ESG grid |
lambert_conformal |
RRFS_CONUS_13km |
ESG grid |
lambert_conformal |
RRFS_CONUS_3km |
ESG grid |
lambert_conformal |
SUBCONUS_Ind_3km |
ESG grid |
lambert_conformal |
4.7. Generate the Forecast Experiment
Generating the forecast experiment requires three steps:
The first two steps depend on the platform being used and are described here for each Level 1 platform. Users will need to adjust the instructions to reflect their machine configuration if they are working on a Level 2-4 platform. Information in Chapter 9: Configuring the Workflow can help with this.
4.7.1. Set Experiment Parameters
Each experiment requires certain basic information to run (e.g., date, grid, physics suite). This information is specified in config_defaults.sh and in the user-specified config.sh file. When generating a new experiment, the SRW App first reads and assigns default values from the config_defaults.sh file. Then, it reads and (re)assigns variables from the user’s custom config.sh file.
4.7.1.1. Default configuration: config_defaults.sh
Note
This section provides background information on how the SRW App uses the config_defaults.sh file. It is informative, but users do not need to modify config_defaults.sh to run the out-of-the-box case for the SRW App. Users may skip to Step 4.7.1.2 to continue configuring their experiment.
Configuration variables in the config_defaults.sh file appear in Table 4.4. Some of these default values are intentionally invalid in order to ensure that the user assigns valid values in the user-specified config.sh file. Any settings provided in config.sh will override the config_defaults.sh
settings. There is usually no need for a user to modify the default configuration file. Additional information on the default settings can be found in the file itself and in Chapter 9.
Group Name |
Configuration variables |
|---|---|
Experiment mode |
RUN_ENVIR |
Machine and queue |
MACHINE, MACHINE_FILE, ACCOUNT, COMPILER, SCHED, LMOD_PATH, NCORES_PER_NODE, BUILD_MOD_FN, WFLOW_MOD_FN, PARTITION_DEFAULT, CLUSTERS_DEFAULT, QUEUE_DEFAULT, PARTITION_HPSS, CLUSTERS_HPSS, QUEUE_HPSS, PARTITION_FCST, CLUSTERS_FCST, QUEUE_FCST |
Workflow management |
WORKFLOW_MANAGER, RUN_CMD_UTILS, RUN_CMD_FCST, RUN_CMD_POST |
Cron |
USE_CRON_TO_RELAUNCH, CRON_RELAUNCH_INTVL_MNTS |
Directory parameters |
EXPT_BASEDIR, EXPT_SUBDIR, EXEC_SUBDIR |
NCO mode |
COMINgfs, FIXLAM_NCO_BASEDIR, STMP, NET, envir, RUN, PTMP |
Separator |
DOT_OR_USCORE |
File name |
EXPT_CONFIG_FN, RGNL_GRID_NML_FN, DATA_TABLE_FN, DIAG_TABLE_FN, FIELD_TABLE_FN, FV3_NML_BASE_SUITE_FN, FV3_NML_YAML_CONFIG_FN, FV3_NML_BASE_ENS_FN, MODEL_CONFIG_FN, NEMS_CONFIG_FN, FV3_EXEC_FN, FCST_MODEL, WFLOW_XML_FN, GLOBAL_VAR_DEFNS_FN, EXTRN_MDL_ICS_VAR_DEFNS_FN, EXTRN_MDL_LBCS_VAR_DEFNS_FN, WFLOW_LAUNCH_SCRIPT_FN, WFLOW_LAUNCH_LOG_FN |
Forecast |
DATE_FIRST_CYCL, DATE_LAST_CYCL, CYCL_HRS, INCR_CYCL_FREQ, FCST_LEN_HRS |
IC/LBC |
EXTRN_MDL_NAME_ICS, EXTRN_MDL_NAME_LBCS, LBC_SPEC_INTVL_HRS, EXTRN_MDL_ICS_OFFSET_HRS, EXTRN_MDL_LBCS_OFFSET_HRS, FV3GFS_FILE_FMT_ICS, FV3GFS_FILE_FMT_LBCS |
NOMADS |
NOMADS, NOMADS_file_type |
External model |
EXTRN_MDL_SYSBASEDIR_ICS, EXTRN_MDL_SYSBASEDIR_LBCS, USE_USER_STAGED_EXTRN_FILES, EXTRN_MDL_SOURCE_BASEDIR_ICS, EXTRN_MDL_FILES_ICS, EXTRN_MDL_SOURCE_BASEDIR_LBCS, EXTRN_MDL_FILES_LBCS |
CCPP |
CCPP_PHYS_SUITE |
Stochastic physics |
NEW_LSCALE, DO_SHUM, DO_SPPT, DO_SKEB, DO_SPP, DO_LSM_SPP, ISEED_SHUM, SHUM_MAG, SHUM_LSCALE, SHUM_TSCALE, SHUM_INT, ISEED_SPPT, SPPT_MAG, SPPT_LOGIT, SPPT_LSCALE, SPPT_TSCALE, SPPT_INT, SPPT_SFCLIMIT, USE_ZMTNBLCK, ISEED_SKEB, SKEB_MAG, SKEB_LSCALE, SKEP_TSCALE, SKEB_INT, SKEBNORM, SKEB_VDOF, ISEED_SPP, SPP_MAG_LIST, SPP_LSCALE, SPP_TSCALE, SPP_SIGTOP1, SPP_SIGTOP2, SPP_STDDEV_CUTOFF, SPP_VAR_LIST, LSM_SPP_TSCALE, LSM_SPP_LSCALE, ISEED_LSM_SPP, LSM_SPP_VAR_LIST, LSM_SPP_MAG_LIST, LSM_SPP_EACH_STEP |
GRID |
GRID_GEN_METHOD, PREDEF_GRID_NAME |
ESG grid |
ESGgrid_LON_CTR, ESGgrid_LAT_CTR, ESGgrid_DELX, ESGgrid_DELY, ESGgrid_NX, ESGgrid_NY, ESGgrid_PAZI ESGgrid_WIDE_HALO_WIDTH |
GFDL grid |
GFDLgrid_LON_T6_CTR, GFDLgrid_LAT_T6_CTR, GFDLgrid_RES, GFDLgrid_STRETCH_FAC, GFDLgrid_REFINE_RATIO, GFDLgrid_ISTART_OF_RGNL_DOM_ON_T6G, GFDLgrid_IEND_OF_RGNL_DOM_ON_T6G, GFDLgrid_JSTART_OF_RGNL_DOM_ON_T6G, GFDLgrid_JEND_OF_RGNL_DOM_ON_T6G, GFDLgrid_USE_GFDLgrid_RES_IN_FILENAMES |
Input configuration |
DT_ATMOS, RESTART_INTERVAL, WRITE_DOPOST, LAYOUT_X, LAYOUT_Y, BLOCKSIZE, QUILTING, PRINT_ESMF, WRTCMP_write_groups, WRTCMP_write_tasks_per_group, WRTCMP_output_grid, WRTCMP_cen_lon, WRTCMP_cen_lat, WRTCMP_lon_lwr_left, WRTCMP_lat_lwr_left, WRTCMP_lon_upr_rght, WRTCMP_lat_upr_rght, WRTCMP_dlon, WRTCMP_dlat, WRTCMP_stdlat1, WRTCMP_stdlat2, WRTCMP_nx, WRTCMP_ny, WRTCMP_dx, WRTCMP_dy |
Experiment generation |
PREEXISTING_DIR_METHOD, VERBOSE, DEBUG |
Cycle-independent |
RUN_TASK_MAKE_GRID, GRID_DIR, RUN_TASK_MAKE_OROG, OROG_DIR, RUN_TASK_MAKE_SFC_CLIMO, SFC_CLIMO_DIR |
Cycle dependent |
RUN_TASK_GET_EXTRN_ICS, RUN_TASK_GET_EXTRN_LBCS, RUN_TASK_MAKE_ICS, RUN_TASK_MAKE_LBCS, RUN_TASK_RUN_FCST, RUN_TASK_RUN_POST |
VX run tasks |
RUN_TASK_GET_OBS_CCPA, RUN_TASK_GET_OBS_MRMS, RUN_TASK_GET_OBS_NDAS, RUN_TASK_VX_GRIDSTAT, RUN_TASK_VX_POINTSTAT, RUN_TASK_VX_ENSGRID, RUN_TASK_VX_ENSPOINT |
Fixed File Parameters |
FIXgsm, FIXaer, FIXlut, TOPO_DIR, SFC_CLIMO_INPUT_DIR, FNGLAC, FNMXIC, FNTSFC, FNSNOC, FNZORC, FNAISC, FNSMCC, FNMSKH, FIXgsm_FILES_TO_COPY_TO_FIXam, FV3_NML_VARNAME_TO_FIXam_FILES_MAPPING, FV3_NML_VARNAME_TO_SFC_CLIMO_FIELD_MAPPING, CYCLEDIR_LINKS_TO_FIXam_FILES_MAPPING |
Workflow tasks |
MAKE_GRID_TN, MAKE_OROG_TN, MAKE_SFC_CLIMO_TN, GET_EXTRN_ICS_TN, GET_EXTRN_LBCS_TN, MAKE_ICS_TN, MAKE_LBCS_TN, RUN_FCST_TN, RUN_POST_TN |
Verification tasks |
GET_OBS, GET_OBS_CCPA_TN, GET_OBS_MRMS_TN, GET_OBS_NDAS_TN, VX_TN, VX_GRIDSTAT_TN, VX_GRIDSTAT_REFC_TN, VX_GRIDSTAT_RETOP_TN, VX_GRIDSTAT_##h_TN, VX_POINTSTAT_TN, VX_ENSGRID_TN, VX_ENSGRID_##h_TN, VX_ENSGRID_REFC_TN, VX_ENSGRID_RETOP_TN, VX_ENSGRID_MEAN_TN, VX_ENSGRID_PROB_TN, VX_ENSGRID_MEAN_##h_TN, VX_ENSGRID_PROB_03h_TN, VX_ENSGRID_PROB_REFC_TN, VX_ENSGRID_PROB_RETOP_TN, VX_ENSPOINT_TN, VX_ENSPOINT_MEAN_TN, VX_ENSPOINT_PROB_TN |
NODE |
NNODES_MAKE_GRID, NNODES_MAKE_OROG, NNODES_MAKE_SFC_CLIMO, NNODES_GET_EXTRN_ICS, NNODES_GET_EXTRN_LBCS, NNODES_MAKE_ICS, NNODES_MAKE_LBCS, NNODES_RUN_FCST, NNODES_RUN_POST, NNODES_GET_OBS_CCPA, NNODES_GET_OBS_MRMS, NNODES_GET_OBS_NDAS, NNODES_VX_GRIDSTAT, NNODES_VX_POINTSTAT, NNODES_VX_ENSGRID, NNODES_VX_ENSGRID_MEAN, NNODES_VX_ENSGRID_PROB, NNODES_VX_ENSPOINT, NNODES_VX_ENSPOINT_MEAN, NNODES_VX_ENSPOINT_PROB |
MPI processes |
PPN_MAKE_GRID, PPN_MAKE_OROG, PPN_MAKE_SFC_CLIMO, PPN_GET_EXTRN_ICS, PPN_GET_EXTRN_LBCS, PPN_MAKE_ICS, PPN_MAKE_LBCS, PPN_RUN_FCST, PPN_RUN_POST, PPN_GET_OBS_CCPA, PPN_GET_OBS_MRMS, PPN_GET_OBS_NDAS, PPN_VX_GRIDSTAT, PPN_VX_POINTSTAT, PPN_VX_ENSGRID, PPN_VX_ENSGRID_MEAN, PPN_VX_ENSGRID_PROB, PPN_VX_ENSPOINT, PPN_VX_ENSPOINT_MEAN, PPN_VX_ENSPOINT_PROB |
Walltime |
WTIME_MAKE_GRID, WTIME_MAKE_OROG, WTIME_MAKE_SFC_CLIMO, WTIME_GET_EXTRN_ICS, WTIME_GET_EXTRN_LBCS, WTIME_MAKE_ICS, WTIME_MAKE_LBCS, WTIME_RUN_FCST, WTIME_RUN_POST, WTIME_GET_OBS_CCPA, WTIME_GET_OBS_MRMS, WTIME_GET_OBS_NDAS, WTIME_VX_GRIDSTAT, WTIME_VX_POINTSTAT, WTIME_VX_ENSGRID, WTIME_VX_ENSGRID_MEAN, WTIME_VX_ENSGRID_PROB, WTIME_VX_ENSPOINT, WTIME_VX_ENSPOINT_MEAN, WTIME_VX_ENSPOINT_PROB |
Maximum attempt |
MAXTRIES_MAKE_GRID, MAXTRIES_MAKE_OROG, MAXTRIES_MAKE_SFC_CLIMO, MAXTRIES_GET_EXTRN_ICS, MAXTRIES_GET_EXTRN_LBCS, MAXTRIES_MAKE_ICS, MAXTRIES_MAKE_LBCS, MAXTRIES_RUN_FCST, MAXTRIES_RUN_POST, MAXTRIES_GET_OBS_CCPA, MAXTRIES_GET_OBS_MRMS, MAXTRIES_GET_OBS_NDAS, MAXTRIES_VX_GRIDSTAT, MAXTRIES_VX_GRIDSTAT_REFC, MAXTRIES_VX_GRIDSTAT_RETOP, MAXTRIES_VX_GRIDSTAT_##h, MAXTRIES_VX_POINTSTAT, MAXTRIES_VX_ENSGRID, MAXTRIES_VX_ENSGRID_REFC, MAXTRIES_VX_ENSGRID_RETOP, MAXTRIES_VX_ENSGRID_##h, MAXTRIES_VX_ENSGRID_MEAN, MAXTRIES_VX_ENSGRID_PROB, MAXTRIES_VX_ENSGRID_MEAN_##h, MAXTRIES_VX_ENSGRID_PROB_##h, MAXTRIES_VX_ENSGRID_PROB_REFC, MAXTRIES_VX_ENSGRID_PROB_RETOP, MAXTRIES_VX_ENSPOINT, MAXTRIES_VX_ENSPOINT_MEAN, MAXTRIES_VX_ENSPOINT_PROB |
Climatology |
SFC_CLIMO_FIELDS, USE_MERRA_CLIMO |
CRTM |
USE_CRTM, CRTM_DIR |
Post configuration |
USE_CUSTOM_POST_CONFIG_FILE, CUSTOM_POST_CONFIG_FP, SUB_HOURLY_POST, DT_SUB_HOURLY_POST_MNTS |
METplus |
MODEL, MET_INSTALL_DIR, MET_BIN_EXEC, METPLUS_PATH, CCPA_OBS_DIR, MRMS_OBS_DIR, NDAS_OBS_DIR |
Running ensembles |
DO_ENSEMBLE, NUM_ENS_MEMBERS |
Boundary blending |
HALO_BLEND |
FVCOM |
USE_FVCOM, FVCOM_WCSTART, FVCOM_DIR, FVCOM_FILE |
Thread Affinity |
KMP_AFFINITY_*, OMP_NUM_THREADS_*, OMP_STACKSIZE_* |
4.7.1.2. User-specific configuration: config.sh
The user must specify certain basic information about the experiment in a config.sh file located in the ufs-srweather-app/regional_workflow/ush directory. Two example templates are provided in that directory: config.community.sh and config.nco.sh. The first file is a minimal example for creating and running an experiment in the community mode (with RUN_ENVIR set to community). The second is an example for creating and running an experiment in the NCO (operational) mode (with RUN_ENVIR set to nco). The community mode is recommended in most cases and is fully supported for this release. The operational/NCO mode is typically used by those at the NOAA/NCEP/Environmental Modeling Center (EMC) and the NOAA/Global Systems Laboratory (GSL) working on pre-implementation testing for the Rapid Refresh Forecast System (RRFS). Table 4.5 shows the configuration variables that appear in the config.community.sh, along with their default values in config_default.sh and the values defined in config.community.sh.
Parameter |
Default Value |
config.community.sh Value |
|---|---|---|
MACHINE |
“BIG_COMPUTER” |
“hera” |
ACCOUNT |
“project_name” |
“an_account” |
EXPT_SUBDIR |
“” |
“test_CONUS_25km_GFSv16” |
COMPILER |
“intel” |
“intel” |
VERBOSE |
“TRUE” |
“TRUE” |
RUN_ENVIR |
“nco” |
“community” |
PREEXISTING_DIR_METHOD |
“delete” |
“rename” |
PREDEF_GRID_NAME |
“” |
“RRFS_CONUS_25km” |
DO_ENSEMBLE |
“FALSE” |
“FALSE” |
NUM_ENS_MEMBERS |
“1” |
“2” |
QUILTING |
“TRUE” |
“TRUE” |
CCPP_PHYS_SUITE |
“FV3_GFS_v16” |
“FV3_GFS_v16” |
FCST_LEN_HRS |
“24” |
“12” |
LBC_SPEC_INTVL_HRS |
“6” |
“6” |
DATE_FIRST_CYCL |
“YYYYMMDD” |
“20190615” |
DATE_LAST_CYCL |
“YYYYMMDD” |
“20190615” |
CYCL_HRS |
(“HH1” “HH2”) |
“18” |
EXTRN_MDL_NAME_ICS |
“FV3GFS” |
“FV3GFS” |
EXTRN_MDL_NAME_LBCS |
“FV3GFS” |
“FV3GFS” |
FV3GFS_FILE_FMT_ICS |
“nemsio” |
“grib2” |
FV3GFS_FILE_FMT_LBCS |
“nemsio” |
“grib2” |
WTIME_RUN_FCST |
“04:30:00” |
“02:00:00” |
USE_USER_STAGED_EXTRN_FILES |
“FALSE” |
“TRUE” |
EXTRN_MDL_SOURCE_BASEDIR_ICS |
“” |
“/scratch2/BMC/det/UFS_SRW_App/develop/input_model_data/FV3GFS/grib2/2019061518” |
EXTRN_MDL_FILES_ICS |
“” |
“gfs.pgrb2.0p25.f000” |
EXTRN_MDL_SOURCE_BASEDIR_LBCS |
“” |
“/scratch2/BMC/det/UFS_SRW_App/develop/input_model_data/FV3GFS/grib2/2019061518” |
EXTRN_MDL_FILES_LBCS |
“” |
“gfs.pgrb2.0p25.f006” “gfs.pgrb2.0p25.f012” |
MODEL |
“” |
FV3_GFS_v16_CONUS_25km” |
METPLUS_PATH |
“” |
“/path/to/METPlus” |
MET_INSTALL_DIR |
“” |
“/path/to/MET” |
CCPA_OBS_DIR |
“” |
“/path/to/processed/CCPA/data” |
MRMS_OBS_DIR |
“” |
“/path/to/processed/MRMS/data” |
NDAS_OBS_DIR |
“” |
“/path/to/processed/NDAS/data” |
RUN_TASK_MAKE_GRID |
“TRUE” |
“TRUE” |
RUN_TASK_MAKE_OROG |
“TRUE” |
“TRUE” |
RUN_TASK_MAKE_SFC_CLIMO |
“TRUE” |
“TRUE” |
RUN_TASK_GET_OBS_CCPA |
“FALSE” |
“FALSE” |
RUN_TASK_GET_OBS_MRMS |
“FALSE” |
“FALSE” |
RUN_TASK_GET_OBS_NDAS |
“FALSE” |
“FALSE” |
RUN_TASK_VX_GRIDSTAT |
“FALSE” |
“FALSE” |
RUN_TASK_VX_POINTSTAT |
“FALSE” |
“FALSE” |
RUN_TASK_VX_ENSGRID |
“FALSE” |
“FALSE” |
RUN_TASK_VX_ENSPOINT |
“FALSE” |
“FALSE” |
To get started, make a copy of config.community.sh. From the ufs-srweather-app directory, run:
cd $SRW/regional_workflow/ush
cp config.community.sh config.sh
The default settings in this file include a predefined 25-km CONUS grid (RRFS_CONUS_25km), the GFS v16 physics suite (FV3_GFS_v16 CCPP), and FV3-based GFS raw external model data for initialization.
Next, edit the new config.sh file to customize it for your machine. At a minimum, change the MACHINE and ACCOUNT variables; then choose a name for the experiment directory by setting EXPT_SUBDIR. If you have pre-staged initialization data for the experiment, set USE_USER_STAGED_EXTRN_FILES="TRUE", and set the paths to the data for EXTRN_MDL_SOURCE_BASEDIR_ICS and EXTRN_MDL_SOURCE_BASEDIR_LBCS. If the modulefile used to set up the build environment in Section 4.4 uses a GNU compiler, check that the line COMPILER="gnu" appears in the config.sh file.
Note
Generic Linux and MacOS users should refer to Section 4.7.1.3 for additional details on configuring an experiment and python environment.
Sample config.sh settings are indicated below for Level 1 platforms. Detailed guidance applicable to all systems can be found in Chapter 9: Configuring the Workflow, which discusses each variable and the options available. Additionally, information about the four predefined Limited Area Model (LAM) Grid options can be found in Chapter 8: Limited Area Model (LAM) Grids.
Hint
To determine an appropriate ACCOUNT field for Level 1 systems, run groups, and it will return a list of projects you have permissions for. Not all of the listed projects/groups have an HPC allocation, but those that do are potentially valid account names.
Minimum parameter settings for running the out-of-the-box SRW App case on Level 1 machines:
Cheyenne:
MACHINE="cheyenne"
ACCOUNT="<my_account>"
EXPT_SUBDIR="<my_expt_name>"
USE_USER_STAGED_EXTRN_FILES="TRUE"
EXTRN_MDL_SOURCE_BASEDIR_ICS="/glade/p/ral/jntp/UFS_SRW_App/v2p0/input_model_data/<model_type>/<data_type>/<YYYYMMDDHH>"
EXTRN_MDL_SOURCE_BASEDIR_LBCS="/glade/p/ral/jntp/UFS_SRW_App/v2p0/input_model_data/<model_type>/<data_type>/<YYYYMMDDHH>"
- where:
<my_account>refers to a valid account name.<my_expt_name>is an experiment name of the user’s choice.<model_type>refers to a subdirectory, such as “FV3GFS” or “HRRR”, containing the experiment data.<data_type>refers to one of 3 possible data formats:grib2,nemsio, ornetcdf.<YYYYMMDDHH>refers to a subdirectory containing data for the cycle date (in YYYYMMDDHH format).
Hera, Jet, Orion, Gaea:
The MACHINE, ACCOUNT, and EXPT_SUBDIR settings are the same as for Cheyenne, except that "cheyenne" should be switched to "hera", "jet", "orion", or "gaea", respectively. Set USE_USER_STAGED_EXTRN_FILES="TRUE", but replace the file paths to Cheyenne’s data with the file paths for the correct machine. EXTRN_MDL_SOURCE_BASEDIR_ICS and EXTRN_MDL_SOURCE_BASEDIR_LBCS use the same base file path.
On Hera:
"/scratch2/BMC/det/UFS_SRW_App/v2p0/input_model_data/<model_type>/<data_type>/<YYYYMMDDHH>/"
On Jet:
"/mnt/lfs4/BMC/wrfruc/UFS_SRW_App/v2p0/input_model_data/<model_type>/<data_type>/<YYYYMMDDHH>/"
On Orion:
"/work/noaa/fv3-cam/UFS_SRW_App/v2p0/input_model_data/<model_type>/<data_type>/<YYYYMMDDHH>/"
On Gaea:
"/lustre/f2/pdata/ncep/UFS_SRW_App/v2p0/input_model_data/<model_type>/<data_type>/<YYYYMMDDHH>/"
On NOAA Cloud Systems:
MACHINE="NOAACLOUD"
ACCOUNT="none"
EXPT_SUBDIR="<my_expt_name>"
USE_USER_STAGED_EXTRN_FILES="TRUE"
EXTRN_MDL_SOURCE_BASEDIR_ICS="/contrib/EPIC/UFS_SRW_App/v2p0/input_model_data/<model_type>/<data_type>/<YYYYMMDDHH>/"
EXTRN_MDL_FILES_ICS=( "gfs.t18z.pgrb2.0p25.f000" )
EXTRN_MDL_SOURCE_BASEDIR_LBCS="/contrib/EPIC/UFS_SRW_App/v2p0/input_model_data/<model_type>/<data_type>/<YYYYMMDDHH>/"
EXTRN_MDL_FILES_LBCS=( "gfs.t18z.pgrb2.0p25.f006" "gfs.t18z.pgrb2.0p25.f012" )
Note
The values of the configuration variables should be consistent with those in the
valid_param_vals.sh script. In addition, various sample configuration files can be found in the regional_workflow/tests/baseline_configs directory.
To configure an experiment and python environment for a general Linux or Mac system, see the next section. To configure an experiment to run METplus verification tasks, see Section 4.7.1.4. Otherwise, skip to Section 4.7.3.
4.7.1.3. User-specific Configuration on a General Linux/MacOS System
The configuration process for Linux and MacOS systems is similar to the process for other systems, but it requires a few extra steps.
Note
Examples in this subsection presume that the user is running Terminal.app with a bash shell environment. If this is not the case, users will need to adjust the commands to fit their command line application and shell environment.
4.7.1.3.1. Install/Upgrade Mac-Specific Packages
MacOS requires the installation of a few additional packages and, possibly, an upgrade to bash. Users running on MacOS should execute the following commands:
bash --version
brew upgrade bash
brew install coreutils
4.7.1.3.2. Creating a Virtual Environment on Linux and Mac
Users should ensure that the following packages are installed and up-to-date:
python3 -m pip --version
python3 -m pip install --upgrade pip
python3 -m ensurepip --default-pip
python3 -m pip install ruby             OR(on MacOS only): brew install ruby
Users must create a virtual environment (regional_workflow), store it in their $HOME/venv/ directory, and install additional python packages:
[[ -d $HOME/venv ]] | mkdir -p $HOME/venv
python3 -m venv $HOME/venv/regional_workflow
source $HOME/venv/regional_workflow/bin/activate
python3 -m pip install jinja2
python3 -m pip install pyyaml
python3 -m pip install f90nml
The virtual environment can be deactivated by running the deactivate command. The virtual environment built here will be reactivated in Step 4.7.2.1 and needs to be used to generate the workflow and run the experiment.
4.7.1.3.3. Configuring an Experiment on General Linux and MacOS Systems
Optional: Install Rocoto
Note
Users may install Rocoto if they want to make use of a workflow manager to run their experiments. However, this option has not been tested yet on MacOS and has had limited testing on general Linux plaforms.
Configure the SRW App:
Configure an experiment using a template. Copy the contents of config.community.sh into config.sh:
cd $SRW/regional_workflow/ush
cp config.community.sh config.sh
In the config.sh file, set MACHINE="macos" or MACHINE="linux", and modify the account and experiment info. For example:
MACHINE="macos"
ACCOUNT="user"
EXPT_SUBDIR="<test_community>"
COMPILER="gnu"
VERBOSE="TRUE"
RUN_ENVIR="community"
PREEXISTING_DIR_METHOD="rename"

PREDEF_GRID_NAME="RRFS_CONUS_25km"
QUILTING="TRUE"
Due to the limited number of processors on MacOS systems, users must also configure the domain decomposition defaults (usually, there are only 8 CPUs in M1-family chips and 4 CPUs for x86_64).
For Option 1, add the following information to config.sh:
LAYOUT_X="${LAYOUT_X:-3}"
LAYOUT_Y="${LAYOUT_Y:-2}"
WRTCMP_write_groups="1"
WRTCMP_write_tasks_per_group="2"
For Option 2, add the following information to config.sh:
LAYOUT_X="${LAYOUT_X:-3}"
LAYOUT_Y="${LAYOUT_Y:-1}"
WRTCMP_write_groups="1"
WRTCMP_write_tasks_per_group="1"
Note
The number of MPI processes required by the forecast will be equal to LAYOUT_X * LAYOUT_Y + WRTCMP_write_tasks_per_group.
Configure the Machine File
Configure a macos.sh or linux.sh machine file in $SRW/regional_workflow/ush/machine/ based on the number of CPUs (<ncores>) in the system (usually 8 or 4 in MacOS; varies on Linux systems). Job scheduler (SCHED) options can be viewed here. Users must also set the path to the fix file directories.
# Commands to run at the start of each workflow task.
PRE_TASK_CMDS='{ ulimit -a; }'

# Architecture information
WORKFLOW_MANAGER="none"
NCORES_PER_NODE=${NCORES_PER_NODE:-<ncores>}
SCHED=${SCHED:-"<sched>"}

# UFS SRW App specific paths
FIXgsm="path/to/FIXgsm/files"
FIXaer="path/to/FIXaer/files"
FIXlut="path/to/FIXlut/files"
TOPO_DIR="path/to/FIXgsm/files" # (path to location of static input files used by the
                                  make_orog task)
SFC_CLIMO_INPUT_DIR="path/to/FIXgsm/files" # (path to location of static surface climatology
                                             input fields used by sfc_climo_gen)

# Run commands for executables
RUN_CMD_SERIAL="time"
RUN_CMD_UTILS="mpirun -np 4"
RUN_CMD_FCST='mpirun -np ${PE_MEMBER01}'
RUN_CMD_POST="mpirun -np 4"
4.7.1.4. Configure METplus Verification Suite (Optional)
Users who want to use the METplus verification suite to evaluate their forecasts need to add additional information to their config.sh file. Other users may skip to the next section.
Attention
METplus installation is not included as part of the build process for this release of the SRW App. However, METplus is preinstalled on many Level 1 & 2 systems. For the v2.0.0 release, METplus use is supported on systems with a functioning METplus installation, although installation itself is not supported. For more information about METplus, see Section 5.4.
Note
If METplus users update their METplus installation, they must update the module load statements in ufs-srweather-app/regional_workflow/modulefiles/tasks/<machine>/run_vx.local file to correspond to their system’s updated installation:
module use -a </path/to/met/modulefiles/>
module load met/<version.X.X>
To use METplus verification, the path to the MET and METplus directories must be added to config.sh:
METPLUS_PATH="</path/to/METplus/METplus-4.1.0>"
MET_INSTALL_DIR="</path/to/met/10.1.0>"
Users who have already staged the observation data needed for METplus (i.e., the CCPA, MRMS, and NDAS data) on their system should set the path to this data and set the corresponding RUN_TASK_GET_OBS_* parameters to “FALSE” in config.sh.
CCPA_OBS_DIR="/path/to/UFS_SRW_App/v2p0/obs_data/ccpa/proc"
MRMS_OBS_DIR="/path/to/UFS_SRW_App/v2p0/obs_data/mrms/proc"
NDAS_OBS_DIR="/path/to/UFS_SRW_App/v2p0/obs_data/ndas/proc"
RUN_TASK_GET_OBS_CCPA="FALSE"
RUN_TASK_GET_OBS_MRMS="FALSE"
RUN_TASK_GET_OBS_NDAS="FALSE"
If users have access to NOAA HPSS but have not pre-staged the data, they can simply set the RUN_TASK_GET_OBS_* tasks to “TRUE”, and the machine will attempt to download the appropriate data from NOAA HPSS. The *_OBS_DIR paths must be set to the location where users want the downloaded data to reside.
Users who do not have access to NOAA HPSS and do not have the data on their system will need to download CCPA, MRMS, and NDAS data manually from collections of publicly available data, such as the ones listed here.
Next, the verification tasks must be turned on according to the user’s needs. Users should add some or all of the following tasks to config.sh, depending on the verification procedure(s) they have in mind:
RUN_TASK_VX_GRIDSTAT="TRUE"
RUN_TASK_VX_POINTSTAT="TRUE"
RUN_TASK_VX_ENSGRID="TRUE"
RUN_TASK_VX_ENSPOINT="TRUE"
These tasks are independent, so users may set some values to “TRUE” and others to “FALSE” depending on the needs of their experiment. Note that the ENSGRID and ENSPOINT tasks apply only to ensemble model verification. Additional verification tasks appear in Table 4.7. More details on all of the parameters in this section are available in Section 9.26.2.
4.7.2. Set Up the Python and Other Environment Parameters
The workflow requires Python 3 with the packages PyYAML, Jinja2, and f90nml available. This Python environment has already been set up on Level 1 platforms, and it can be activated in the following way:
module use <path/to/modulefiles>
module load wflow_<platform>
The wflow_<platform> modulefile will then output instructions to activate the regional workflow. The user should run the commands specified in the modulefile output. For example, if the output says:
Please do the following to activate conda:
    > conda activate regional_workflow
then the user should run conda activate regional_workflow. This will activate the regional_workflow conda environment. However, the command(s) will vary from system to system. Regardless, the user should see (regional_workflow) in front of the Terminal prompt at this point. If this is not the case, activate the regional workflow from the ush directory by running:
conda init
source ~/.bashrc
conda activate regional_workflow
4.7.2.1. Activating the Workflow Environment on Non-Level 1 Systems
Users on non-Level 1 systems can copy one of the provided wflow_<platform> files and use it as a template to create a wflow_<platform> file that works for their system. wflow_macos and wflow_linux template files are provided with the release. After making appropriate modifications to a wflow_<platform> file, users can run the commands from Step 4.7.2 above to activate the regional workflow.
On generic Linux or MacOS systems, loading the designated wflow_<platform> file will output instructions similar to the following:
Please do the following to activate conda:
    > source $VENV/bin/activate
If that does not work, users can also try:
source $HOME/venv/regional_workflow/bin/activate
However, it may instead be necessary to make additional adjustments to the wflow_<platform> file.
4.7.3. Generate the Regional Workflow
Run the following command from the ufs-srweather-app/regional_workflow/ush directory to generate the workflow:
./generate_FV3LAM_wflow.sh
The last line of output from this script, starting with */1 * * * * or */3 * * * *, can be saved and used later to automatically run portions of the workflow if users have the Rocoto workflow manager installed on their system.
This workflow generation script creates an experiment directory and populates it with all the data needed to run through the workflow. The flowchart in Figure 4.2 describes the experiment generation process. First, generate_FV3LAM_wflow.sh runs the setup.sh script to set the configuration parameters. Second, it copies the time-independent (fix) files and other necessary data input files from their location in the ufs-weather-model directory to the experiment directory ($EXPTDIR). Third, it copies the weather model executable (ufs_model) from the bin directory to $EXPTDIR and creates the input namelist file input.nml based on the input.nml.FV3 file in the regional_workflow/ush/templates directory. Lastly, it creates the workflow XML file FV3LAM_wflow.xml that is executed when running the experiment with the Rocoto workflow manager.
The setup.sh script reads three other configuration scripts in order: (1) config_default.sh (Section 4.7.1.1), (2) config.sh (Section 4.7.1.2), and (3) set_predef_grid_params.sh. If a parameter is specified differently in these scripts, the file containing the last defined value will be used.
The generated workflow will appear in $EXPTDIR, where EXPTDIR=${EXPT_BASEDIR}/${EXPT_SUBDIR}. These variables were specified in the config.sh file in Step 4.7.1.2. The settings for these paths can also be viewed in the console output from the ./generate_FV3LAM_wflow.sh script or in the log.generate_FV3LAM_wflow file, which can be found in $EXPTDIR.
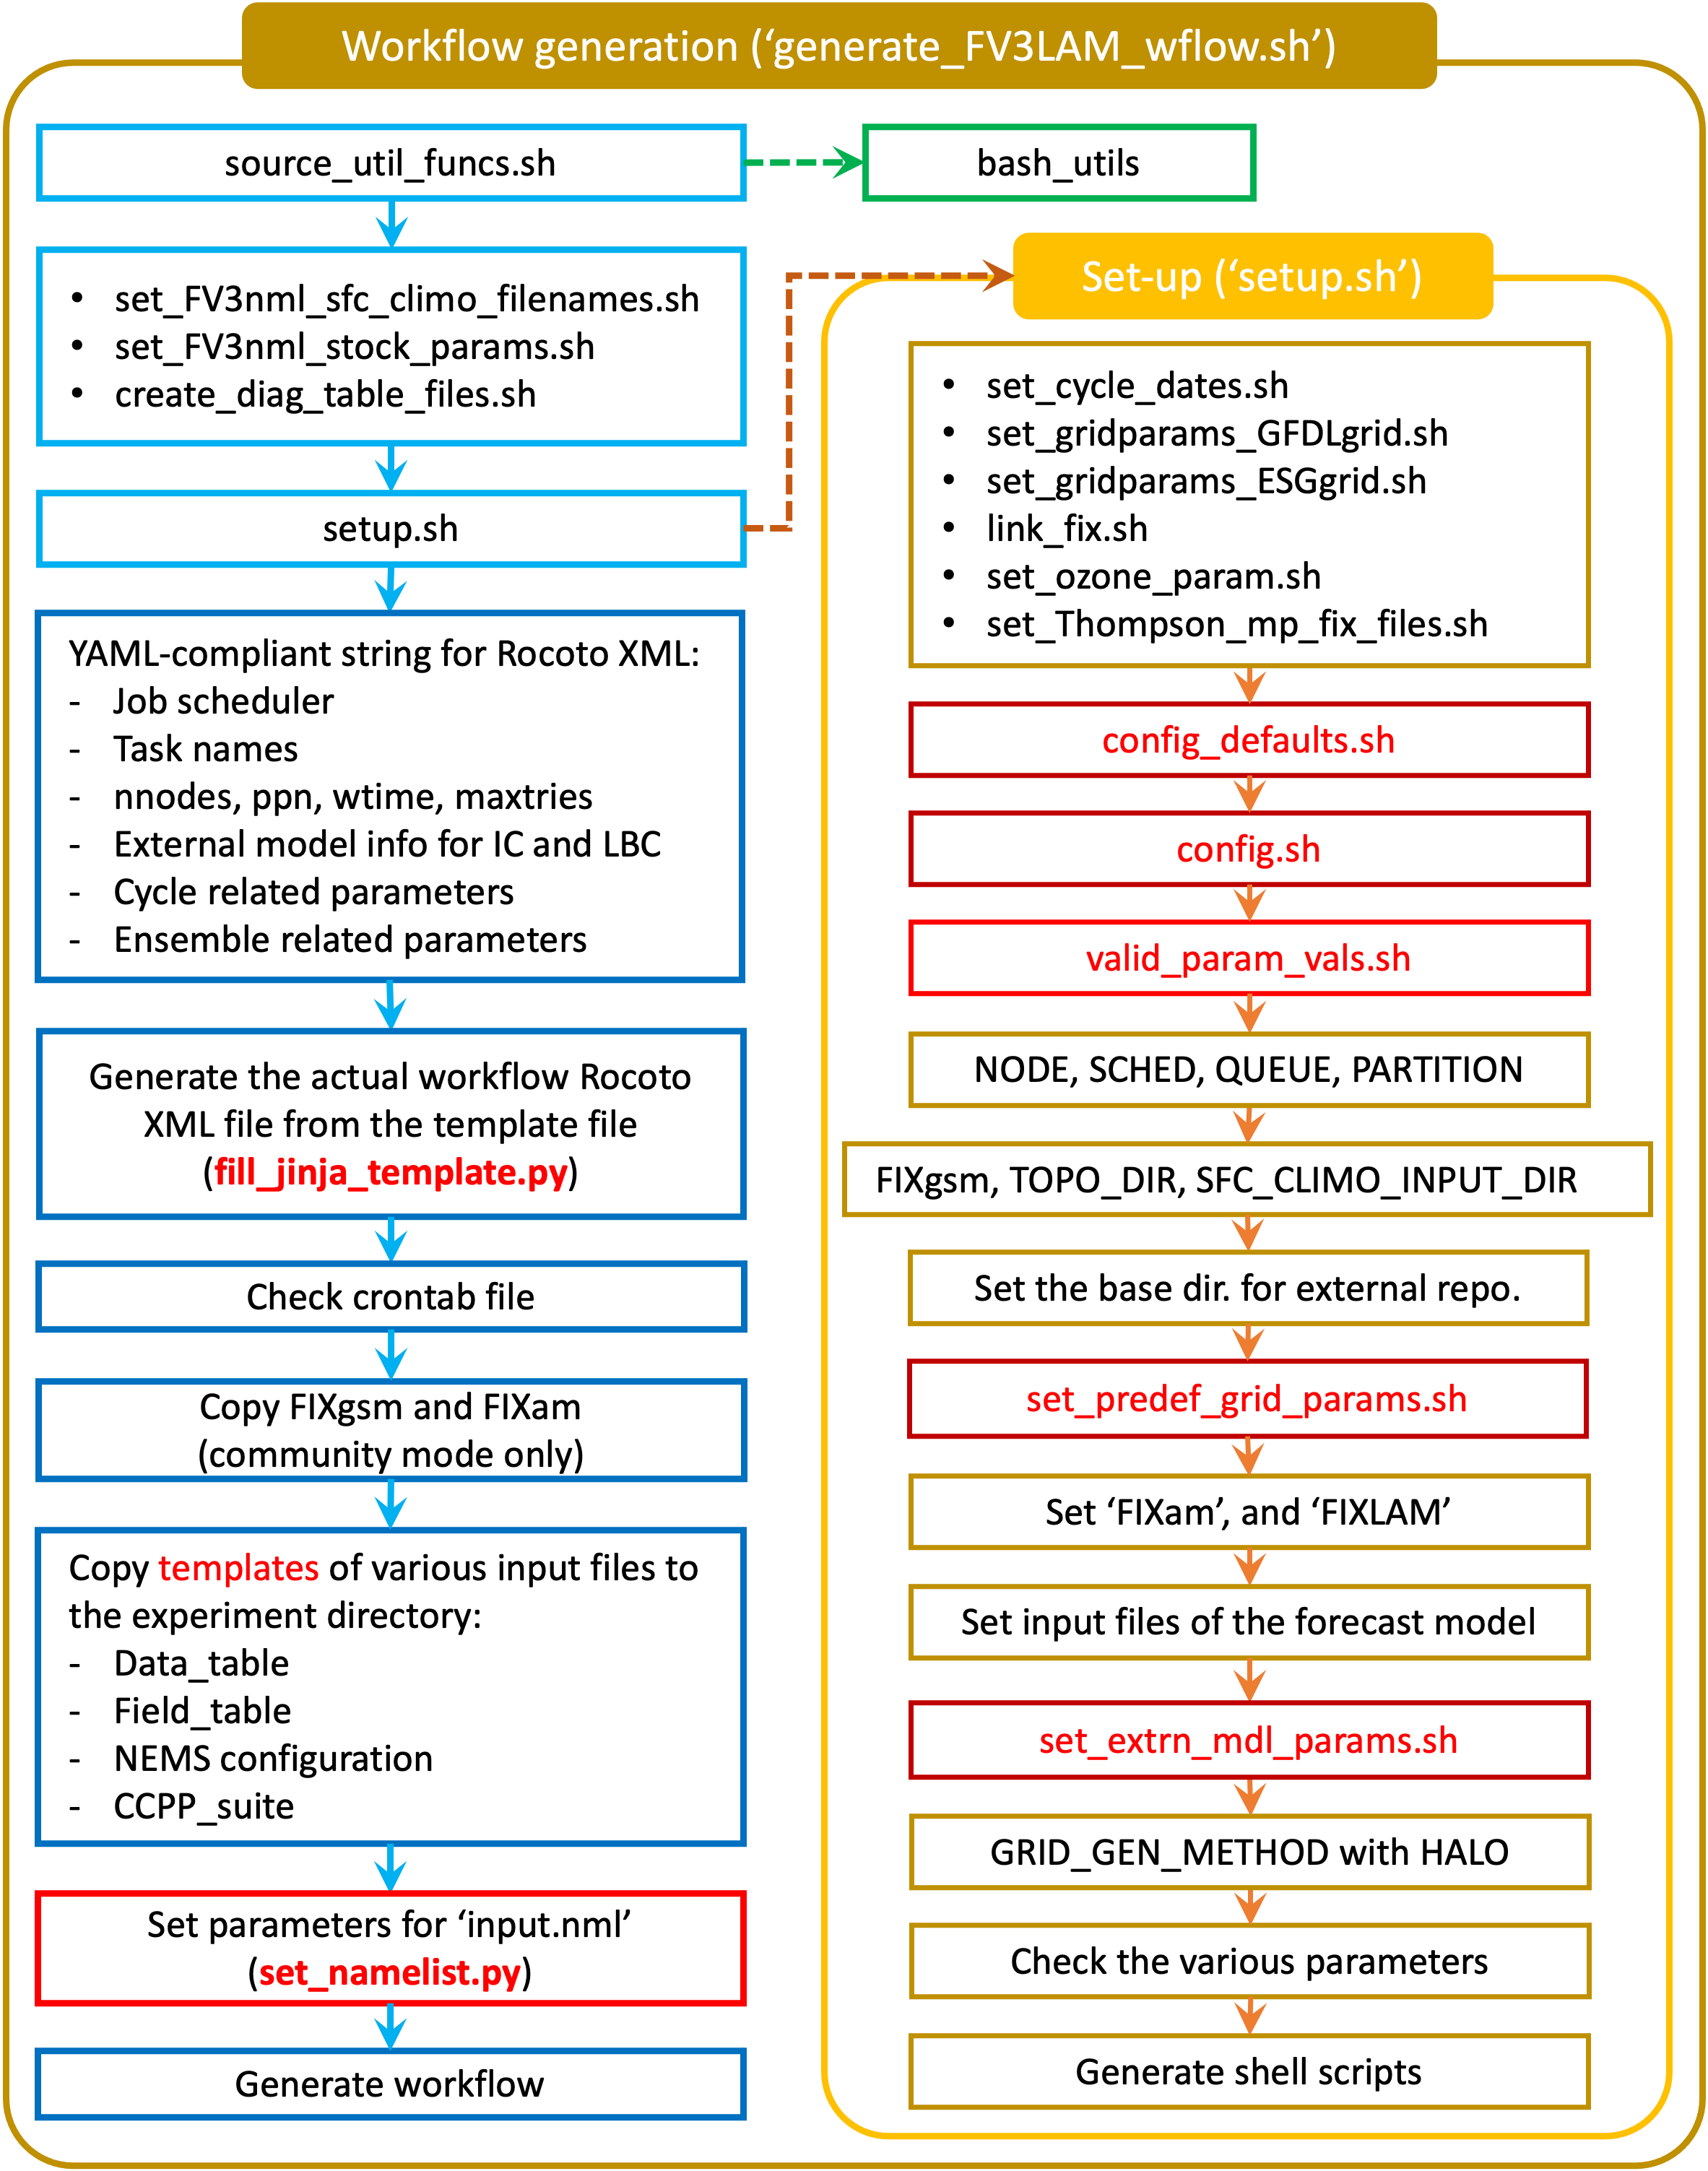
Fig. 4.2 Experiment generation description
4.7.4. Description of Workflow Tasks
Note
This section gives a general overview of workflow tasks. To begin running the workflow, skip to Step 4.8
Figure 4.3 illustrates the overall workflow. Individual tasks that make up the workflow are specified in the FV3LAM_wflow.xml file. Table 4.6 describes the function of each baseline task. The first three pre-processing tasks; MAKE_GRID, MAKE_OROG, and MAKE_SFC_CLIMO are optional. If the user stages pre-generated grid, orography, and surface climatology fix files, these three tasks can be skipped by adding the following lines to the config.sh file before running the generate_FV3LAM_wflow.sh script:
RUN_TASK_MAKE_GRID="FALSE"
RUN_TASK_MAKE_OROG="FALSE"
RUN_TASK_MAKE_SFC_CLIMO="FALSE"
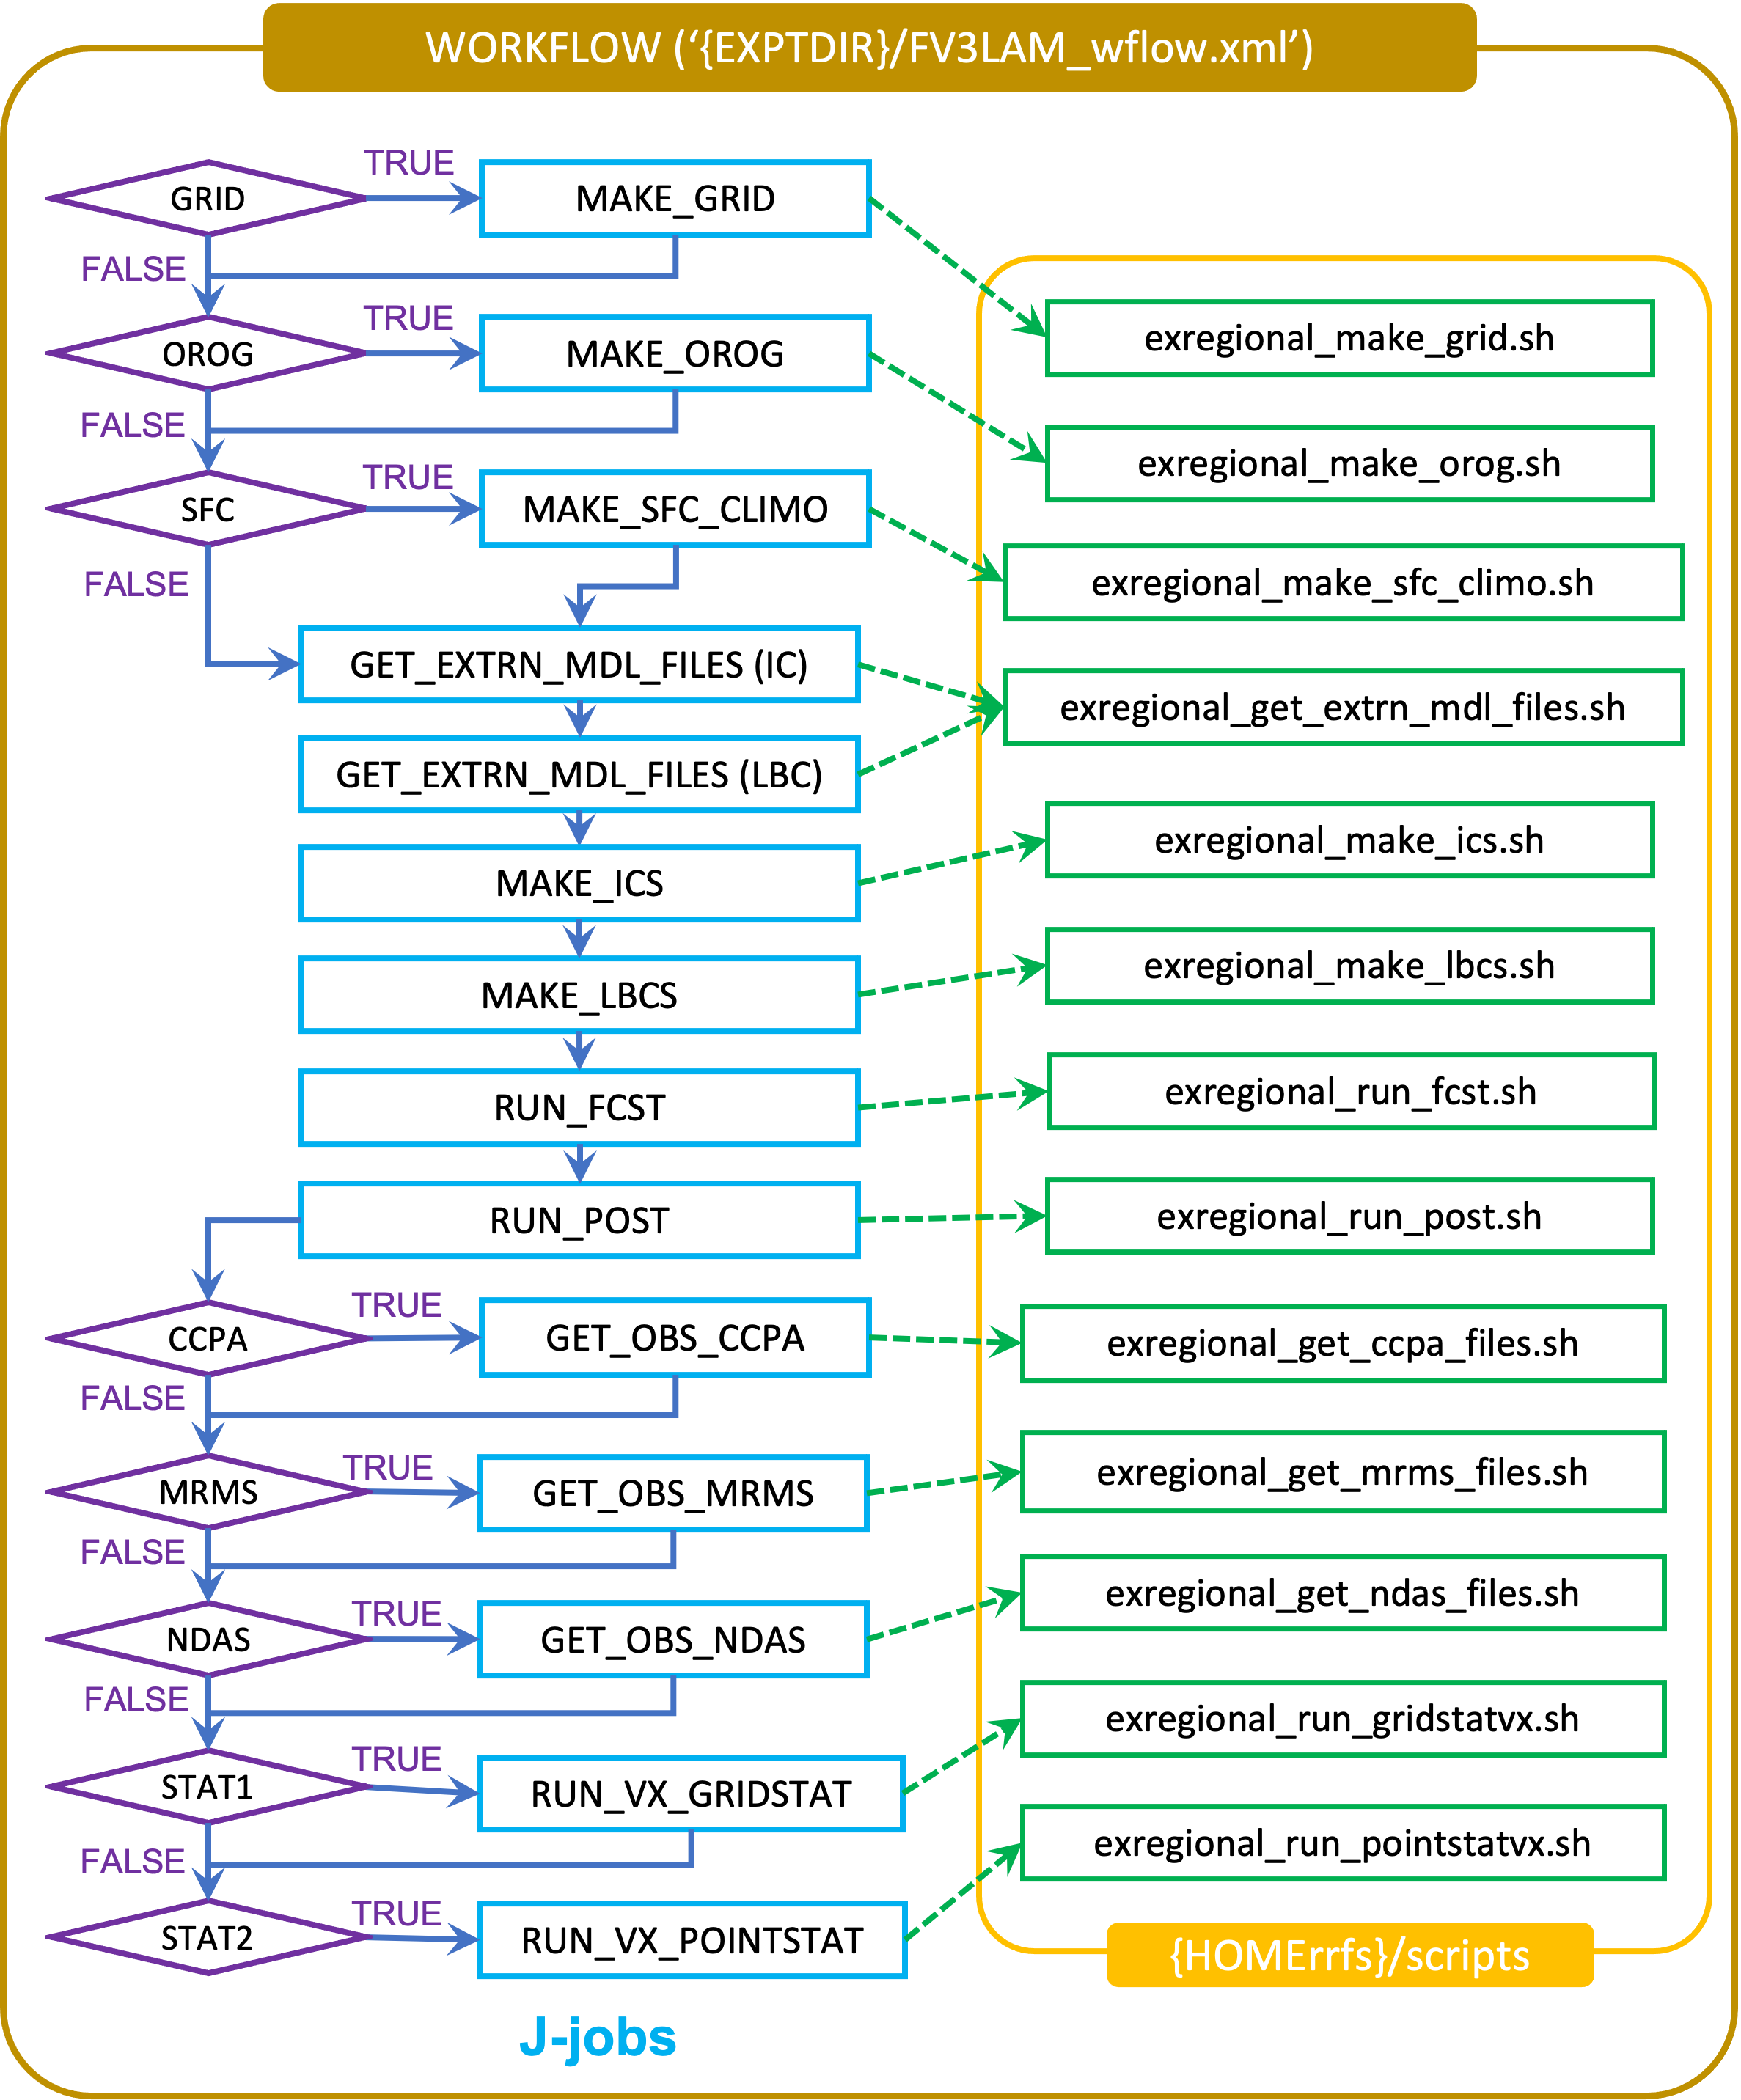
Fig. 4.3 Flowchart of the workflow tasks
The FV3LAM_wflow.xml file runs the specific j-job scripts (regional_workflow/jobs/JREGIONAL_[task name]) in the prescribed order when the experiment is launched via the launch_FV3LAM_wflow.sh script or the rocotorun command. Each j-job task has its own source script (or “ex-script”) named exregional_[task name].sh in the regional_workflow/scripts directory. Two database files named FV3LAM_wflow.db and FV3LAM_wflow_lock.db are generated and updated by the Rocoto calls. There is usually no need for users to modify these files. To relaunch the workflow from scratch, delete these two *.db files and then call the launch script repeatedly for each task.
Workflow Task |
Task Description |
|---|---|
make_grid |
Pre-processing task to generate regional grid files. Only needs to be run once per experiment. |
make_orog |
Pre-processing task to generate orography files. Only needs to be run once per experiment. |
make_sfc_climo |
Pre-processing task to generate surface climatology files. Only needs to be run, at most, once per experiment. |
get_extrn_ics |
Cycle-specific task to obtain external data for the initial conditions |
get_extrn_lbcs |
Cycle-specific task to obtain external data for the lateral boundary conditions (LBCs) |
make_ics |
Generate initial conditions from the external data |
make_lbcs |
Generate LBCs from the external data |
run_fcst |
Run the forecast model (UFS weather model) |
run_post |
Run the post-processing tool (UPP) |
In addition to the baseline tasks described in Table 4.6 above, users may choose to run some or all of the METplus verification tasks. These tasks are described in Table 4.7 below.
Workflow Task |
Task Description |
|---|---|
GET_OBS_CCPA |
Retrieves and organizes hourly CCPA data from NOAA
HPSS. Can only be run if |
GET_OBS_NDAS |
Retrieves and organizes hourly NDAS data from NOAA
HPSS. Can only be run if |
GET_OBS_MRMS |
Retrieves and organizes hourly MRMS composite
reflectivity and echo top data from NOAA HPSS. Can
only be run if |
VX_GRIDSTAT |
Runs METplus grid-to-grid verification for 1-h accumulated precipitation |
VX_GRIDSTAT_REFC |
Runs METplus grid-to-grid verification for composite reflectivity |
VX_GRIDSTAT_RETOP |
Runs METplus grid-to-grid verification for echo top |
VX_GRIDSTAT_##h |
Runs METplus grid-to-grid verification for 3-h, 6-h, and
24-h (i.e., daily) accumulated precipitation. Valid values
for |
VX_POINTSTAT |
Runs METplus grid-to-point verification for surface and upper-air variables |
VX_ENSGRID |
Runs METplus grid-to-grid ensemble verification for 1-h
accumulated precipitation. Can only be run if
|
VX_ENSGRID_REFC |
Runs METplus grid-to-grid ensemble verification for
composite reflectivity. Can only be run if
|
VX_ENSGRID_RETOP |
Runs METplus grid-to-grid ensemble verification for
echo top. Can only be run if |
VX_ENSGRID_##h |
Runs METplus grid-to-grid ensemble verification for 3-h,
6-h, and 24-h (i.e., daily) accumulated precipitation.
Valid values for |
VX_ENSGRID_MEAN |
Runs METplus grid-to-grid verification for ensemble mean
1-h accumulated precipitation. Can only be run if
|
VX_ENSGRID_PROB |
Runs METplus grid-to-grid verification for 1-h accumulated
precipitation probabilistic output. Can only be run if
|
VX_ENSGRID_MEAN_##h |
Runs METplus grid-to-grid verification for ensemble mean
3-h, 6-h, and 24h (i.e., daily) accumulated precipitation.
Valid values for |
VX_ENSGRID_PROB_##h |
Runs METplus grid-to-grid verification for 3-h, 6-h, and
24h (i.e., daily) accumulated precipitation probabilistic
output. Valid values for |
VX_ENSGRID_PROB_REFC |
Runs METplus grid-to-grid verification for ensemble
probabilities for composite reflectivity. Can only be run
if |
VX_ENSGRID_PROB_RETOP |
Runs METplus grid-to-grid verification for ensemble
probabilities for echo top. Can only be run if
|
VX_ENSPOINT |
Runs METplus grid-to-point ensemble verification for
surface and upper-air variables. Can only be run if
|
VX_ENSPOINT_MEAN |
Runs METplus grid-to-point verification for ensemble mean
surface and upper-air variables. Can only be run if
|
VX_ENSPOINT_PROB |
Runs METplus grid-to-point verification for ensemble
probabilities for surface and upper-air variables. Can
only be run if |
4.8. Run the Workflow Using Rocoto
Attention
If users are running the SRW App in a container or on a system that does not have Rocoto installed (e.g., Level 3 & 4 systems, such as MacOS or generic Linux systems), they should follow the process outlined in Section 3.5 instead of the instructions in this section.
The information in this section assumes that Rocoto is available on the desired platform. All official HPC platforms for the UFS SRW App release make use of the Rocoto workflow management software for running experiments. However, Rocoto cannot be used when running the workflow within a container. If Rocoto is not available, it is still possible to run the workflow using stand-alone scripts according to the process outlined in Section 3.5.
There are two main ways to run the workflow with Rocoto: (1) with the launch_FV3LAM_wflow.sh script, and (2) by manually calling the rocotorun command. Users can also automate the workflow using a crontab.
Note
Users may find it helpful to review Chapter 10 to gain a better understanding of Rocoto commands and workflow management before continuing, but this is not required to run the experiment.
Optionally, an environment variable can be set to navigate to the $EXPTDIR more easily. If the login shell is bash, it can be set as follows:
export EXPTDIR=/<path-to-experiment>/<directory_name>
If the login shell is csh/tcsh, it can be set using:
setenv EXPTDIR /<path-to-experiment>/<directory_name>
4.8.1. Launch the Rocoto Workflow Using a Script
To run Rocoto using the launch_FV3LAM_wflow.sh script provided, simply call it without any arguments:
cd $EXPTDIR
./launch_FV3LAM_wflow.sh
This script creates a log file named log.launch_FV3LAM_wflow in $EXPTDIR or appends information to the file if it already exists. The launch script also creates the log/FV3LAM_wflow.log file, which shows Rocoto task information. Check the end of the log file periodically to see how the experiment is progressing:
tail -n 40 log.launch_FV3LAM_wflow
In order to launch additional tasks in the workflow, call the launch script again; this action will need to be repeated until all tasks in the workflow have been launched. To (re)launch the workflow and check its progress on a single line, run:
./launch_FV3LAM_wflow.sh; tail -n 40 log.launch_FV3LAM_wflow
This will output the last 40 lines of the log file, which list the status of the workflow tasks (e.g., SUCCEEDED, DEAD, RUNNING, SUBMITTING, QUEUED). The number 40 can be changed according to the user’s preferences. The output will look like this:
CYCLE                    TASK                       JOBID        STATE   EXIT STATUS   TRIES  DURATION
======================================================================================================
202006170000        make_grid         druby://hfe01:33728   SUBMITTING             -       0       0.0
202006170000        make_orog                           -            -             -       -         -
202006170000   make_sfc_climo                           -            -             -       -         -
202006170000    get_extrn_ics         druby://hfe01:33728   SUBMITTING             -       0       0.0
202006170000   get_extrn_lbcs         druby://hfe01:33728   SUBMITTING             -       0       0.0
202006170000         make_ics                           -            -             -       -         -
202006170000        make_lbcs                           -            -             -       -         -
202006170000         run_fcst                           -            -             -       -         -
202006170000      run_post_00                           -            -             -       -         -
202006170000      run_post_01                           -            -             -       -         -
202006170000      run_post_02                           -            -             -       -         -
202006170000      run_post_03                           -            -             -       -         -
202006170000      run_post_04                           -            -             -       -         -
202006170000      run_post_05                           -            -             -       -         -
202006170000      run_post_06                           -            -             -       -         -

Summary of workflow status:
~~~~~~~~~~~~~~~~~~~~~~~~~~

  0 out of 1 cycles completed.
  Workflow status:  IN PROGRESS
If all the tasks complete successfully, the “Workflow status” at the bottom of the log file will change from “IN PROGRESS” to “SUCCESS”. If certain tasks could not complete, the “Workflow status” will instead change to “FAILURE”. Error messages for each specific task can be found in the task log files located in $EXPTDIR/log.
The workflow run is complete when all tasks have “SUCCEEDED”. If everything goes smoothly, users will eventually see a workflow status table similar to the following:
CYCLE              TASK                   JOBID         STATE        EXIT STATUS   TRIES   DURATION
==========================================================================================================
201906150000       make_grid              4953154       SUCCEEDED         0          1          5.0
201906150000       make_orog              4953176       SUCCEEDED         0          1         26.0
201906150000       make_sfc_climo         4953179       SUCCEEDED         0          1         33.0
201906150000       get_extrn_ics          4953155       SUCCEEDED         0          1          2.0
201906150000       get_extrn_lbcs         4953156       SUCCEEDED         0          1          2.0
201906150000       make_ics               4953184       SUCCEEDED         0          1         16.0
201906150000       make_lbcs              4953185       SUCCEEDED         0          1         71.0
201906150000       run_fcst               4953196       SUCCEEDED         0          1       1035.0
201906150000       run_post_f000          4953244       SUCCEEDED         0          1          5.0
201906150000       run_post_f001          4953245       SUCCEEDED         0          1          4.0
...
201906150000       run_post_f012          4953381       SUCCEEDED         0          1          7.0
If users choose to run METplus verification tasks as part of their experiment, the output above will include additional lines after run_post_f012. The output will resemble the following but may be significantly longer when using ensemble verification:
CYCLE              TASK                   JOBID          STATE       EXIT STATUS   TRIES   DURATION
==========================================================================================================
201906150000       make_grid              30466134       SUCCEEDED        0          1          5.0
...
201906150000       run_post_f012          30468271       SUCCEEDED        0          1          7.0
201906150000       run_gridstatvx         30468420       SUCCEEDED        0          1         53.0
201906150000       run_gridstatvx_refc    30468421       SUCCEEDED        0          1        934.0
201906150000       run_gridstatvx_retop   30468422       SUCCEEDED        0          1       1002.0
201906150000       run_gridstatvx_03h     30468491       SUCCEEDED        0          1         43.0
201906150000       run_gridstatvx_06h     30468492       SUCCEEDED        0          1         29.0
201906150000       run_gridstatvx_24h     30468493       SUCCEEDED        0          1         20.0
201906150000       run_pointstatvx        30468423       SUCCEEDED        0          1        670.0
4.8.2. Launch the Rocoto Workflow Manually
4.8.2.1. Load Rocoto
Instead of running the ./launch_FV3LAM_wflow.sh script, users can load Rocoto and any other required modules. This gives the user more control over the process and allows them to view experiment progress more easily. On Level 1 systems, the Rocoto modules are loaded automatically in Step 4.7.2. For most other systems, a variant on the following commands will be necessary to load the Rocoto module:
module use <path_to_rocoto_package>
module load rocoto
Some systems may require a version number (e.g., module load rocoto/1.3.3)
4.8.2.2. Run the Rocoto Workflow
After loading Rocoto, call rocotorun from the experiment directory to launch the workflow tasks. This will start any tasks that do not have a dependency. As the workflow progresses through its stages, rocotostat will show the state of each task and allow users to monitor progress:
cd $EXPTDIR
rocotorun -w FV3LAM_wflow.xml -d FV3LAM_wflow.db -v 10
rocotostat -w FV3LAM_wflow.xml -d FV3LAM_wflow.db -v 10
The rocotorun and rocotostat commands above will need to be resubmitted regularly and repeatedly until the experiment is finished. In part, this is to avoid having the system time out. This also ensures that when one task ends, tasks dependent on it will run as soon as possible, and rocotostat will capture the new progress.
If the experiment fails, the rocotostat command will indicate which task failed. Users can look at the log file in the log subdirectory for the failed task to determine what caused the failure. For example, if the make_grid task failed, users can open the make_grid.log file to see what caused the problem:
cd $EXPTDIR/log
vi make_grid.log
Note
If users have the Slurm workload manager on their system, they can run the squeue command in lieu of rocotostat to check what jobs are currently running.
4.8.3. Automated Option
For automatic resubmission of the workflow at regular intervals (e.g., every minute), the user can add the following commands to their config.sh file before generating the experiment:
USE_CRON_TO_RELAUNCH="TRUE"
CRON_RELAUNCH_INTVL_MNTS="02"
Alternatively, the user can add a crontab entry using the crontab -e command. As mentioned in Section 4.7.3, the last line of output from ./generate_FV3LAM_wflow.sh (starting with */1 * * * * or */3 * * * *), can be pasted into the crontab file. It can also be found in the $EXPTDIR/log.generate_FV3LAM_wflow file. The crontab entry should resemble the following:
*/3 * * * * cd <path/to/experiment/subdirectory> && ./launch_FV3LAM_wflow.sh called_from_cron="TRUE"
where <path/to/experiment/subdirectory> is changed to correspond to the user’s $EXPTDIR. The number 3 can be changed to a different positive integer and simply means that the workflow will be resubmitted every three minutes.
Hint
On NOAA Cloud instances,
*/1 * * * *is the preferred option for cron jobs because compute nodes will shut down if they remain idle too long. If the compute node shuts down, it can take 15-20 minutes to start up a new one.On other NOAA HPC systems, admins discourage the
*/1 * * * *due to load problems.*/3 * * * *is the preferred option for cron jobs on non-NOAA Cloud systems.
To check the experiment progress:
cd $EXPTDIR
rocotostat -w FV3LAM_wflow.xml -d FV3LAM_wflow.db -v 10
After finishing the experiment, open the crontab using crontab -e and delete the crontab entry.
Note
On Orion, cron is only available on the orion-login-1 node, so users will need to work on that node when running cron jobs on Orion.
The workflow run is complete when all tasks have “SUCCEEDED”, and the rocotostat command outputs a table similar to the one above.
4.9. Plot the Output
Two python scripts are provided to generate plots from the FV3-LAM post-processed GRIB2 output. Information on how to generate the graphics can be found in Chapter 12.