7. Input and Output Files
This chapter provides an overview of the input and output files needed by the components of the UFS SRW Application. Links to more detailed documentation for each of the components (e.g., UFS_UTILS, the UFS Weather Model, and the UPP) are provided in the sections below. For SRW App users who want to jump straight to downloading and staging the required files, see Section 7.3.
7.1. Input Files
The SRW Application requires numerous input files to run: static datasets (fix files containing climatological information, terrain, and land use data), initial and boundary conditions files, and model configuration files (such as namelists).
7.1.1. Initial and Boundary Condition Files
The external model files needed for initializing an experiment can be obtained in a number of ways, including:
pulled directly from NOMADS (limited timespan for data availability),
pulled from the NOAA High Performance Storage System (HPSS) during the workflow execution (requires user access), or
obtained and staged by the user from a different source.
The data format for these files can be GRIB2 or NEMSIO. More information on downloading and setting up the external model data can be found in Section 7.3. Once the data is set up, the end-to-end application will run the system and write output files to disk.
7.1.2. Pre-processing (UFS_UTILS)
When a user generates the regional workflow as described in Section 5.3.3, the workflow generation script links the input data for the pre-processing utilities to the experiment directory. The pre-processing utilities use many different datasets to create grids and to generate model input datasets from the external model files. A detailed description of the input files for the pre-processing utilities can be found in the UFS_UTILS Technical Documentation and Scientific Documentation.
7.1.3. UFS Weather Model
The input files for the UFS Weather Model include both static (fixed) files and grid- and date-specific files (terrain, initial conditions, boundary conditions, etc). The static fix(ed) files must be staged by the user unless the user is running on a Level 1/pre-configured platform, in which case users can link to the existing copy of the data on their machine. See Section 7.3.1 for instructions. The workflow scripts link the static, grid, and date-specific files in the experiment directory. An extensive description of the input files for the Weather Model can be found in the UFS Weather Model User’s Guide. The namelists and configuration files for the SRW Application are created from templates by the workflow generation script, as described in Section 7.1.5.
7.1.4. Unified Post Processor (UPP)
Documentation for the UPP input files can be found in the UPP User’s Guide.
7.1.5. Workflow
The SRW Application uses a series of template files, combined with user-selected settings,
to create the required namelists and parameter files needed by the SRW Application workflow. (See Figure 5.2 for a visual summary of the workflow generation process, including template use.) These templates can be reviewed to see which defaults are used and where configuration parameters from the config.yaml file are assigned.
7.1.5.1. List of Template Files
The template files for the SRW Application are located in the parm directory
and are shown in Table 7.1.
File Name |
Description |
|---|---|
data_table |
Cycle-independent file that the forecast model reads in at the start of each forecast. It is an empty file. No need to change. |
diag_table.[CCPP] |
File specifying the output fields of the forecast model.
A different |
field_table.[CCPP] |
Cycle-independent file that the forecast model
reads in at the start of each forecast. It specifies the
tracers that the forecast model will
advect. A different |
FV3.input.yml |
YAML configuration file containing the forecast model’s
namelist settings for various physics suites. The values
specified in this file update the corresponding values in
the |
FV3LAM_wflow.xml |
Rocoto XML file to run the workflow. It is filled in using
the |
input.nml.FV3 |
Namelist file for the Weather Model. |
model_configure |
Settings and configurations for the NUOPC/ESMF main component. |
nems.configure |
NEMS (NOAA Environmental Modeling System) configuration file. No need to change because it is an atmosphere-only model in the SRW Application. |
regional_grid.nml |
Namelist settings for the code that generates an ESG grid. |
README.xml_templating.md |
Instructions for Rocoto XML templating with Jinja. |
Additional information related to diag_table.[CCPP], field_table.[CCPP], input.nml.FV3, model_configure, and nems.configure can be found in the UFS Weather Model User’s Guide, while information on regional_grid.nml options can be found in the UFS_UTILS Technical Documentation.
7.1.5.2. Migratory Route of the Input Files in the Workflow
Figure 7.1 shows how the input files in the template directory (ufs-srweather-app/parm) flow to the experiment directory. First, the CCPP physics suite is specified in the configuration file. The template input files corresponding to the selected physics suite, such as field_table.[CCPP] and nems.configure_[CCPP], are copied to the experiment directory ($EXPTDIR). Additionally, the namelist file of the Weather Model (input.nml) is created from the input.nml.FV3 and FV3.input.yml files by running the workflow generation script. While running the RUN_FCST task in the regional workflow as shown in Figure 5.3, the field_table, nems.configure, and input.nml files, located in $EXPTDIR, are linked to the cycle directory ($CYCLE_DIR). Additionally, diag_table and model_configure are copied from the parm directory. Finally, these files are updated with the variables specified in var_defn.sh.
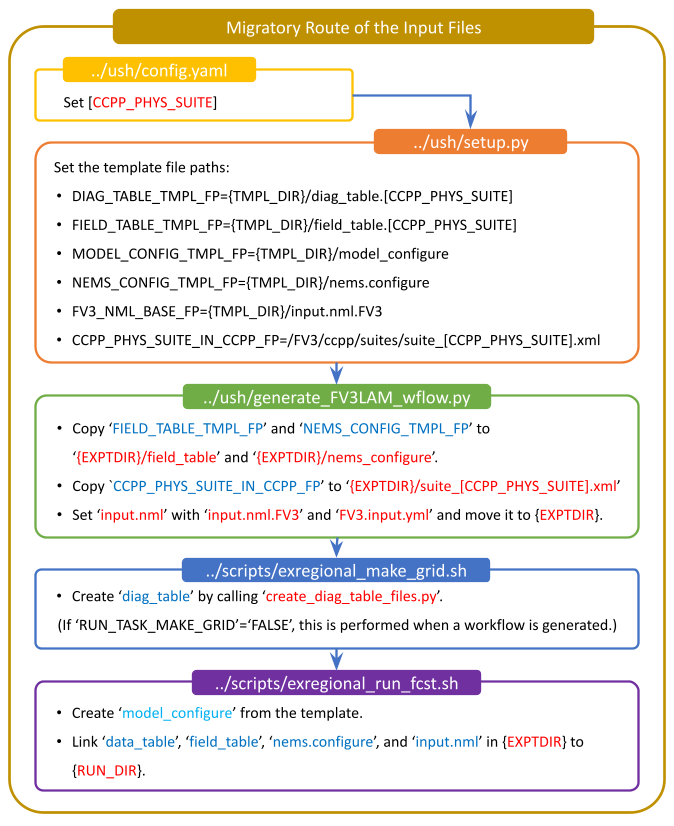
Fig. 7.1 Migratory Route of Input Files
7.2. Output Files
Output files from each workflow task are written to a subdirectory within the experiment directory ($EXPTDIR/YYYYMMDDHH), named based on the settings in config.yaml.
7.2.1. Initial and boundary condition files
The external model data used by chgres_cube (as part of the pre-processing utilities) are located
in the experiment directory under $EXPTDIR/YYYYMMDDHH/EXTRN_MDL_NAME/{for_ICS/for_LBCS}.
7.2.2. Pre-processing (UFS_UTILS)
The files output by the other pre-processing utilities reside in the INPUT directory under the
experiment directory ($EXPTDIR/YYYYMMDDHH/INPUT) and consist of the following:
C403_grid.tile7.halo3.ncgfs_bndy.tile7.HHH.ncgfs_ctrl.ncgfs_data.ncgfs_data.tile7.halo0.ncgrid_spec.ncgrid.tile7.halo4.ncoro_data.ncoro_data.tile7.halo4.ncsfc_data.nc -> sfc_data.tile7.halo0.ncsfc_data.tile7.halo0.nctmp_ICStmp_LBCS
These output files are used as inputs for the UFS Weather Model and are described in the UFS Weather Model User’s Guide. gfs_bndy.tile7.HHH.nc refers to a series of IC/LBC files where HHH is the 3-digit hour of the forecast.
7.2.3. UFS Weather Model
As stated in Section 5.3.2.2, the workflow can be run in “community” mode or “nco” mode, which determines the location and names of the output files. Weather Model output files can be in netCDF or NEMSIO format. The output file format is set in the model_configure file (see Table 7.1) using the output_file variable. At this time, due to limitations in the post-processing component, only netCDF output is recommended as output for the SRW Application.
Note
The fully supported options for this release include running in “community” mode with netCDF-formatted output files.
In this case, the netCDF output files are written to the $EXPTDIR/YYYYMMDDHH directory. The bases of the file names are specified in the input file model_configure and are set to the following in the SRW Application:
dynfHHH.ncphyfHHH.nc
where HHH corresponds to the 3-digit forecast hour (e.g., dynf006.nc for the 6th hour of the forecast). Additional details may be found in the UFS Weather Model User’s Guide.
7.2.4. Unified Post Processor (UPP)
Documentation for the UPP output files can be found in the UPP User’s Guide.
For the SRW Application, the Weather Model netCDF output files are written to $EXPTDIR/YYYYMMDDHH/postprd and have the naming convention (file->linked to):
NATLEV_{YY}{JJJ}{hh}{mm}f{fhr}00 -> {domain}.t{cyc}z.natlevf{fhr}.tmXX.grib2PRSLEV_{YY}{JJJ}{hh}{mm}f{fhr}00 -> {domain}.t{cyc}z.prslevf{fhr}.tmXX.grib2
The default setting for the output file names uses rrfs for {domain}. This may be overridden by the user in the config.yaml settings.
7.2.4.1. Modifying the UPP Output
If users wish to modify the fields or levels that are output from the UPP, they will need to make modifications to fv3lam.xml, which resides in the UPP repository distributed with the UFS SRW Application. If the code was cloned into the directory ufs-srweather-app, the file will be located in ufs-srweather-app/sorc/UPP/parm.
Note
This process requires advanced knowledge of which fields can be output for the UFS Weather Model.
- UPP Product Output Tables for the UFS SRW LAM Grid:
Use the instructions in the UPP User’s Guide to make modifications to the fv3lam.xml file and to remake the flat text file, called postxconfig-NT-fv3lam.txt (default), that the UPP reads.
After creating the new flat text file to reflect the changes, users will need to modify their config.yaml to point the workflow to the new text file. In config.yaml, set the following:
USE_CUSTOM_POST_CONFIG_FILE: true
CUSTOM_POST_CONFIG_FP: </path/to/custom/postxconfig-NT-fv3lam.txt>
which tells the workflow to use the custom file located in the user-defined path. The path should include the filename. If USE_CUSTOM_POST_CONFIG_FILE is set to true, but the file path is not found, then an error will occur when trying to generate the SRW Application workflow.
Users may then start their experiment workflow as usual, and the UPP will use the new flat *.txt file.
7.2.4.2. Outputting Satellite Products from UPP
Synthetic satellite products for several instruments and channels (e.g., GOES 16/17) may be output through the UPP using the Community Radiative Transfer Model (CRTM). External CRTM coefficient files, available through the UPP stand-alone release, will need to be manually downloaded before running the workflow. These instructions assume that the UPP configuration file (postxconfig-NT-fv3lam.txt) has already been set up to output satellite products using the process described above in Section 7.2.4.1.
Download and unpack the external files:
mkdir crtm && cd crtm
wget https://github.com/NOAA-EMC/UPP/releases/download/upp_v11.0.0/fix.tar.gz
tar -xzf fix.tar.gz
Modify the config.yaml file to include the following lines:
USE_CRTM: true
CRTM_DIR: </path/to/top/crtm/dir>
By setting USE_CRTM to true, the workflow will use the path defined in CRTM_DIR to link the necessary coefficient files to the working directory at runtime. Otherwise, it is assumed that no satellite fields are being requested in the UPP configuration. CRTM_DIR should point to the top CRTM directory where the fix files are located.
Note
Dependencies for outputting synthetic satellite products may exist based on model configuration (e.g., model physics).
7.3. Downloading and Staging Input Data
A set of input files, including static (fix) data and raw initial and lateral boundary conditions (IC/LBCs), is required to run the SRW Application. The data required for the “out-of-the-box” SRW App case described in Chapters 3 and 5 is already preinstalled on Level 1 & 2 systems, along with data required to run the WE2E test cases. Therefore, users on these systems do not need to stage the fixed files manually because they have been prestaged, and the paths are set in ush/setup.sh. Users on Level 3 & 4 systems can find the most recent SRW App release data in the UFS SRW Application Data Bucket by clicking on Browse Bucket.
7.3.1. Static Files
Static files are available in the “fix” directory of the SRW App Data Bucket. Users can download the full set of fix files as a tar file:
wget https://noaa-ufs-srw-pds.s3.amazonaws.com/experiment-user-cases/release-public-v2.1.0/out-of-the-box/fix_data.tgz
tar -xzf fix_data.tgz
Alternatively, users can download the static files individually from the “fix” directory of the SRW Data Bucket using the wget command for each required file. A list of wget commands with links is provided here for the release v2.1.0 fix file data. Users will need to create an appropriate directory structure for the files when downloading them individually. The best solution is to download the files into directories that mirror the structure of the Data Bucket.
The environment variables FIXgsm, TOPO_DIR, and SFC_CLIMO_INPUT_DIR indicate the path to the directories where the static files are located. After downloading the experiment data, users must set the paths to the files in config.yaml. Add the following code to the task_run_fcst: section of the config.yaml file, and alter the variable paths accordingly:
FIXgsm: </path-to/fix/fix_am>
TOPO_DIR: </path-to/fix/fix_am/fix_orog>
SFC_CLIMO_INPUT_DIR: </path-to/fix_am/fix/sfc_climo/>
7.3.2. Initial Condition/Lateral Boundary Condition File Formats and Source
The SRW Application currently supports raw initial and lateral boundary conditions from numerous models (i.e., FV3GFS, NAM, RAP, HRRR). The data can be provided in three formats: NEMSIO, netCDF, or GRIB2.
To download the model input data for the 12-hour “out-of-the-box” experiment configuration in config.community.yaml file, run:
wget https://noaa-ufs-srw-pds.s3.amazonaws.com/experiment-user-cases/release-public-v2.1.0/out-of-the-box/gst_data.tgz
tar -xzf gst_data.tgz
To download data for different dates, model types, and formats, users can explore the input_model_data section of the data bucket and replace the links above with ones that fetch their desired data.
7.3.3. Initial and Lateral Boundary Condition Organization
The paths to EXTRN_MDL_SOURCE_BASEDIR_ICS and EXTRN_MDL_SOURCE_BASEDIR_LBCS must be set in the appropriate sections of the config.yaml file:
task_get_extrn_ics:
   USE_USER_STAGED_EXTRN_FILES: true
   EXTRN_MDL_SOURCE_BASEDIR_ICS: <path/to/ufs-srweather-app/input_model_data/FV3GFS/grib2/YYYYMMDDHH>
   EXTRN_MDL_DATA_STORES: disk
task_get_extrn_lbcs:
   USE_USER_STAGED_EXTRN_FILES: true
   EXTRN_MDL_SOURCE_BASEDIR_LBCS: <path/to/ufs-srweather-app/input_model_data/FV3GFS/grib2/YYYYMMDDHH>
   EXTRN_MDL_DATA_STORES: disk
The two EXTRN_MDL_SOURCE_BASEDIR_*CS variables describe where the IC and LBC file directories are located, respectively. For ease of reusing config.yaml across experiments, it is recommended that users set up the raw IC/LBC file paths to include the model name (e.g., FV3GFS, NAM, RAP, HRRR), data format (e.g., grib2, nemsio), and date (in YYYYMMDDHH format). For example: /path-to/input_model_data/FV3GFS/grib2/2019061518/. While there is flexibility to modify these settings, this structure will provide the most reusability for multiple dates when using the SRW Application workflow.
When files are pulled from NOAA HPSS (rather than downloaded from the data bucket), the naming convention looks something like:
FV3GFS (GRIB2):
gfs.t{cycle}z.pgrb2.0p25.f{fhr}FV3GFS (NEMSIO):
ICs:
gfs.t{cycle}z.atmanl.nemsioandgfs.t{cycle}z.sfcanl.nemsio;LBCs:
gfs.t{cycle}z.atmf{fhr}.nemsio
RAP (GRIB2):
rap.t{cycle}z.wrfprsf{fhr}.grib2HRRR (GRIB2):
hrrr.t{cycle}z.wrfprsf{fhr}.grib2
where:
{cycle}corresponds to the 2-digit hour of the day when the forecast cycle starts, and
{fhr}corresponds to the 2- or 3-digit nth hour of the forecast (3-digits for FV3GFS data and 2 digits for RAP/HRRR data).
For example, a forecast using FV3GFS GRIB2 data that starts at 18h00 UTC would have a {cycle} value of 18, which is the 000th forecast hour. The LBCS file for 21h00 UTC would be named gfs.t18z.pgrb2.0p25.f003.
In some cases, it may be necessary to specify values for EXTRN_MDL_FILES_*CS``variables. This is often the case with HRRR and RAP data. An example ``config.yaml excerpt using HRRR and RAP data appears below:
task_get_extrn_ics:
   EXTRN_MDL_NAME_ICS: HRRR
   USE_USER_STAGED_EXTRN_FILES: true
   EXTRN_MDL_FILES_ICS:
      - '{yy}{jjj}{hh}00{fcst_hr:02d}00'
task_get_extrn_lbcs:
   EXTRN_MDL_NAME_LBCS: RAP
   LBC_SPEC_INTVL_HRS: 3
   USE_USER_STAGED_EXTRN_FILES: true
   EXTRN_MDL_FILES_LBCS:
      - '{yy}{jjj}{hh}00{fcst_hr:02d}00'
7.3.4. Default Initial and Lateral Boundary Conditions
The default initial and lateral boundary condition files are set to be a severe weather case from June 15, 2019 (20190615) at 18 UTC. FV3GFS GRIB2 files are the default model and file format. A tar file
(gst_data.tgz) containing the model data for this case is available in the UFS SRW App Data Bucket.
7.3.5. Running the App for Different Dates
If users want to run the SRW Application for dates other than June 15-16, 2019, they will need to modify the config.yaml settings, including the DATE_FIRST_CYCL and DATE_LAST_CYCL variables. The forecast length can be modified by changing the FCST_LEN_HRS. In addition, the lateral boundary interval can be specified using the LBC_SPEC_INTVL_HRS variable.
Users will need to ensure that the initial and lateral boundary condition files are available in the specified path for their new date, cycle, and forecast length.
7.3.6. Staging Initial Conditions Manually
If users want to run the SRW Application with raw model files for dates other than those that
are currently available on the preconfigured platforms, they need to stage the data manually.
The data should be placed in EXTRN_MDL_SOURCE_BASEDIR_ICS and EXTRN_MDL_SOURCE_BASEDIR_LBCS (which may be the same directory). The path to these variables can be set in the config.yaml file as shown above. Raw model files are available from a number of sources. A few examples are provided here for convenience.
NOMADS: https://nomads.ncep.noaa.gov/pub/data/nccf/com/{model}/prod, where model may be:
GFS (GRIB2 or NEMSIO) - available for the last 10 days https://nomads.ncep.noaa.gov/pub/data/nccf/com/gfs/prod/
NAM - available for the last 8 days https://nomads.ncep.noaa.gov/pub/data/nccf/com/nam/prod/
RAP - available for the last 2 days https://nomads.ncep.noaa.gov/pub/data/nccf/com/rap/prod/
HRRR - available for the last 2 days https://nomads.ncep.noaa.gov/pub/data/nccf/com/hrrr/prod/
AWS S3 Data Buckets:
HRRR: https://registry.opendata.aws/noaa-hrrr-pds/ (necessary fields for initializing available for dates 2015 and newer)
Google Cloud:
FTP Data Repository (data for SRW Release v1.0.0 & v1.0.1):
Others:
University of Utah HRRR archive: http://home.chpc.utah.edu/~u0553130/Brian_Blaylock/cgi-bin/hrrr_download.cgi
NAM nest archive: https://www.ready.noaa.gov/archives.php
NAM data older than 6 months can be requested through the Archive Information Request System: https://www.ncei.noaa.gov/has/HAS.FileAppRouter?datasetname=NAM218&subqueryby=STATION&applname=&outdest=FILE
RAP isobaric data older than 6 months can be requested through the Archive Information Request System: https://www.ncei.noaa.gov/has/HAS.FileAppRouter?datasetname=RAP130&subqueryby=STATION&applname=&outdest=FILE
7.3.7. Coexistence of Multiple Files for the Same Date
It is recommended that users have a separate directory for each file format if they choose to store files in multiple formats (e.g., GRIB2, NEMSIO, netCDF) for the same date. For example, the directory structure for a user storing GFS GRIB2 and NEMSIO files might resemble the following:
/path-to/input_model_data/FV3GFS/grib2/YYYYMMDDHH
/path-to/input_model_data/FV3GFS/nemsio/YYYYMMDDHH
Additionally, users must set the following environment variables if they plan to use GRIB2-formatted files for FV3GFS:
FV3GFS_FILE_FMT_ICS: grib2
FV3GFS_FILE_FMT_LBCS: grib2
This is ONLY necessary when using FV3GFS GRIB2 files. These settings may be removed when initializing from the default NEMSIO format for FV3GFS files.
7.3.8. Best Practices for Conserving Disk Space and Keeping Files Safe
Initial and lateral boundary condition files are large and can occupy a significant amount of
disk space. If several users will employ a common file system to run forecasts, it is recommended
that the users share the same EXTRN_MDL_SOURCE_BASEDIR_ICS and EXTRN_MDL_SOURCE_BASEDIR_LBCS
directories. That way, if raw model input files are already on disk for a given date, they do not
need to be replicated.
The files in the subdirectories of the EXTRN_MDL_SOURCE_BASEDIR_ICS and EXTRN_MDL_SOURCE_BASEDIR_LBCS directories should be write-protected. This prevents these files from being accidentally modified or deleted. The directories should generally be group-writable so the directory can be shared among multiple users.